
I thought it would be fun to do a new coloring medium every few months so......here is the short Copic tutorial I put together for those of you who want to understand a little bit better how Copic markers work.
I was fortunate enough to take the Copic Marker Certification class in Chicago a few weeks ago and so I thought I would take some of that information, coupled with my own experiences having played with the markers for over a year now, and compile a short lesson.
Copic markers are alcohol based markers, therefore they can do a lot more than your basic art marker. There are several types of Copic markers--including the original Copic, the Sketch markers, and the Ciaos.
I own a few of each type but I love the Ciao the best---why? Because the slim shape make them very easy to use and they are also the most economical of the group. Since the markers all have the same ink---finding the barrel of your choice is a matter of personal preference. However, you CAN change out the tips of the markers so if you would rather have the tip that comes with the Sketch marker (for example), you can always just buy one and change out the ones in your marker.
The Ciao markers have a pointed tip and a chisel tip. I use the pointed tip for all of my detail work and most of my coloring in general. The chisel tip is a fast way to apply a lot of color and I use this side mostly for backgrounds or to fill very large images.
Here is how I store my Copics! My father-in-law built me a new desk and an extra storage cube that sits right beside the desk. This is the top drawer of the cube. Other drawers house my other coloring tools. It makes it really easy to just pull a drawer out and work right next to it. And---I never have to pause in my work to replace the marker exactly where it came from. So this works great for me.
 For this tutorial, I am using a stamped image from the Summer Harvest set by Gina K Designs. I stamped the image in Brilliance Black ink on Whisper White Cardstock (Stampin' Up!) and then I picked out the colors I wanted to use to color the image.
Again...the cardstock choice is a matter of personal preference. I know a lot of people like to work on the Neenah cardstock or even the Georgia Pacific, but I have gotten fine results with the whisper white so it is what I use. Find what works best for you!
Note: I keep a scratch piece of paper (in the SAME cardstock I am working with) next to me when I work so I can test color choices and clean off my blender pen. Using the same cardstock enables you to see how the color will show up on the cardstock you are using...makes sense?
I am working on my new Scor-Mat (that fits perfectly on top of my Scor-Pal--so it never has to get put away!!!) A must have for all Scor-Pal owners!!!
The colors I chose for this image are:
Pea Green, Olive, Lipstick Red, Lipstick Orange, Sepia and the Blender pen.

First, I used the lighter shade of green--Pea Green-- to color the leaf. It is important to note here that you should choose two shades of a color that are different enough to form a contrast. You do not want to use colors that are just a hair different or the shading will not look as dramatic.
When coloring the image, you do not have to make sure your base color is perfect. A few white spots or lighter areas are fine...and, in fact, desirable to get a good finished product.

Then, I took my darker shade of green--Olive--and went over the image in the places I thought would be some natural shadows...along the bottom of the leaf, near the stem and a bit by the vein.

Then, go back to the lighter shade--Pea Green---and in CIRCULAR movements move the tip over all the areas where the darker green meets the lighter green. The colors will blend beautifully and you will not see a harsh line anymore. NOTE: It is important to do this step while the first color is fresh (ie. not dry) so, when coloring an image like this, I would color two leaves and then go back to do the shading and blending and then go on to color two more, etc.
 I am not finished with the leaf yet....but I am giving it time to dry before the next step!
For the cherry....the same idea. I took the lighter shade of red and colored the image. Then, I added the darker red and blended with the lighter shade. For this cherry, I deliberately left a small spot without any color.
 Here is the cherry with the darker color added to the bottom edge and blended with the lighter color:

Then, I went back and colored all the leaves and the cherries the same way....working two or three at a time:
 Finally, AFTER THE IMAGE is dry I used my Colorless Blender to add some more highlights to the image. For this step, just take the colorless blender and remove color by coloring smaller areas where you would like a highlight. Unless you hold the blender on the image and push down hard....the ink removal will be slow so you can carefully remove the ink until you reach the desired effect you want. NOTE: Remember to write with the Blender pen on the scratch paper before moving to a new color so that you don't transfer the color you removed from the previous area to the next area you are working on.

Oopsie---I realized at this point that I never colored the branch. Hee! So I grabbed my Sepia marker and added that at this point.
 Here is the cherry with the darker color added to the bottom edge and blended with the lighter color:
Then, I went back and colored all the leaves and the cherries the same way....working two or three at a time:
 Finally, AFTER THE IMAGE is dry I used my Colorless Blender to add some more highlights to the image. For this step, just take the colorless blender and remove color by coloring smaller areas where you would like a highlight. Unless you hold the blender on the image and push down hard....the ink removal will be slow so you can carefully remove the ink until you reach the desired effect you want. NOTE: Remember to write with the Blender pen on the scratch paper before moving to a new color so that you don't transfer the color you removed from the previous area to the next area you are working on.
Oopsie---I realized at this point that I never colored the branch. Hee! So I grabbed my Sepia marker and added that at this point.
Once dry, I used my Colorless Blender pen to soften the color in the middle of the branch.

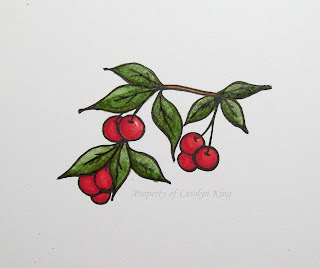
Here is my finished product! Notice that even in the area of the cherry where I left off an area of color, that when I used my blender pen over it..it softened the look of it making it more like a highlight rather than a white spot.

Here is my finished product! Notice that even in the area of the cherry where I left off an area of color, that when I used my blender pen over it..it softened the look of it making it more like a highlight rather than a white spot.
This image is ready to be used on a card......
or....made into a magnet!
After trimming my image, I cut a piece of red cardstock to put on the back on the image and then placed the image and the red cardstock inside --added the glass on the front and back and closed the frame (VERY EASY!)

or....made into a magnet!
I purchased these Memory Frames and Memory Glass pieces last month and have been wanting to use them. I thought that this image would make an adorable refrigerator magnet. (In fact, I think a set of magnets using the fruit in this set would be such an adorable gift!)
Anyway...the Memory Frames that I purchased are Antique Copper in color and they have a little circular top for use on a chain or for a ribbon tie. I didn't want to use that part for the magnet, so I just used my heavy duty scissors and yanked it off. Since it is soldered on, it was not hard to remove!

After trimming my image, I cut a piece of red cardstock to put on the back on the image and then placed the image and the red cardstock inside --added the glass on the front and back and closed the frame (VERY EASY!)
I used some Scotch mounting tape to attach the magnet to the back of the magnet, which looks like this:

Whola! ........The finished magnet!
 Materials used: Stamps- Summer Harvest (Gina K Designs), sentiment - Hey there Cupcake (Stampendous); Brilliance Black ink; Copic markers; whisper white cardstock (Stampin' Up!); Antique Copper Memory Frame and Memory Glass (Ranger); Foam mounting tape (Scotch); magnetic strip.
Hope you enjoyed this tutorial.
Thanks for stopping by!

42 comments:
Great tutorial Carolyn! I still have SU markers GASP... I know but they work for me right now. hee he
Incredibly and keenly detailed tutorial. You've answered all my questions about Copics and I'm now armed with information and ready to jump in - credit card in hand. Thank you for a most excellent tutorial Divine, dah-ling. Simply and truly.
Thanks Caro, gotta run kids then I am reading every word of this!
Thanks for ther tutorial! :-)
I have been drooling over Copics for a long time but can't afford the big price tag. I saw that Prismacolor also has alcohol based markers that are more affordable and I am wondering if the coloring is of the same quality, I think I'll have to give them a try... ;-)
FABULOUS tutorial, Carolyn and I LOVE the finished product. . .just beautiful!
This copic tutorial and project is Fabulous!! very easy to understand....makes me want copics too...maybe later. Thanks for sharing!!
Oh wow! Thank you for that! You made it seem so easy!
Quick question though...do you think the colourless blender pen will work with the SU markers? or is blending a feature of the alcohol based markers?
Thanks!
Awesome Carolyn!!! Thanks for doing this!
I'm glad to see I'm not the only one who uses WW and Ciao markers...haha! Being in Canada my options for white paper are not readily available.
LOVE your end result!
What a fabulous tutorial!!! *STAMPIN HUGS* Alex
Great tutorial, Cam! It's nice to show that even on smaller images, you can still get great shading and details. (P.S. LOVE your storage system, too!) :)
Great tutorial, Cammie! I love your magnet!
Thanks for this... Great job...
Great tutorial. Looks great as a magnet. TFS
Awesome tutorial!!! I'm off to practice!! :)
Thanks for the tutorial!! I'm just now finally getting into Copics, practicing and looking at all the tips I can find. Your image looks awesome! I'm going to try to work with my colorless blender a little more for the extra highlighting.
AWEsome tutorial!!! And thank you....I'm struggling so much to learn how to use my Copics and you make it look so easy!!
great tutorial
Thanks Cammie! I have read many different Copic tutorials and seem to learn something or reinforce something with everyone I read. Thanks for taking the time.
Fabulous tutorial Cammie!! Thanks for showing us how you work!! :)
Dang. You make it look so easy, girl! But, I know it's not... You are so talented. Wonderful tutorial. Maybe I'll give the markers another try..
Thanks for a great tutorial, now let's see if I can make it as easy as you demonstrate it...LOL!
Great tutorial Carolyn :) Cute and funny too! Thanks for sharing! Can't wait to buy some copics!
Cami, thanks for the cool tutorial on using the copics. I would love to take a class. If they are ever in Atlanta, I will be there! I have been having trouble making them blend, so I really learned from your tutorial!
Pinky
Wow, that's alot of markers, lol! This is a great tutorial; and thanks for explaining everything in detail!! Very pretty coloring!!
What a great tutorial, Cammie! Thank you so much for sharing your tips; they were very helpful. I still have only one of the four Ciao sets and find myself anxious for the rest of them to have the various shades of color. Your cherry magnet is adorable!!
Thank you so much for this great tutorial. I have resisted trying another coloring technique. but now I think I may have to get just a few Caio's.
Fantastic tutorial, Carolyn!! Your magnet is darling too!!
Fabulous tutorial! I hope you don't mind if I share a link to your blog, on my blog! :)
Hi Carolyn,
Thank you for the great tutorial! I have the PrismaColor markers so I'm trying them - for now! I was sent to your site via Kim of [Kim's Kreative Korner]! She was sweet enough to help me find you! Thank you again!
Stunning tutorial...
tried it and achieved great result...
Regards,
SBL-Photoshop Masking
Oh, wow! I just tried it.. THANK YOU! It looks really cool when I try it like you said. I really appreciate this tutorial :)
This tutorial is wonderful, especially for those of us with sets of Copics sitting here on our desks gathering dust, because we can't seem to get the technique right. I followed your tips and instructions and finally am pleased with my results. I know it's like any new technique...practice, practice,practice...but your tutorial is making the difference for me. Thank you so much for sharing your knowledge with others.
Finally just what I needed a detailed tut on how to use copics ashamed to say here but I purchased them and they have done nothing but sitting around, glad to see that now I won't be wasting my money!
Can anyone tell me what I might be doing wrong? I stamp my image on watercolor card stock or really nice card stock with Stazon black ink and find that my Copic marker smears when I color in or try to blend the color such as the face area!!! Help!!! Thanks so much for any help. Sara
I've just discovered copics and bought my first ones today aswell as finding your tutorial. The tips look great and I shall be having a go. Thanks.
Fabulous tutorial! TFS!
Sara---you do not need to use watercolor paper unless you are using water. This will hurt your ability to blend colors.
What type of ink are you using...that is important too. I use Memento tuxedo black ink. It works perfectly with Copics (you need just a few seconds of drying time before you start to color.)
Hope this helps!
Hi Cammie, just wanted to post real quick to tell you that although this copic tutorial post is an oldie, I needed some copic coloring inspiration TODAY and your tutorial did the trick! Thank you for sharing your talents with the world :) xoxo
New to Copic and I found your tutorial today. Thanks.
Thanks for sharing such a great color tutorial.
prepresse
I am usually to blogging and i actually admire your content. The article has really peaks my interest. I am going to bookmark your site and keep checking for brand spanking new information. mgm online casino
Prediksi Togel Singapore
Prediksi Togel Hongkong
Prediksi Togel Sidney
Result Singapore 45
Result Singapore 45
Result Hongkong
Result Sidney
Buku Mimpi 2D
Buku Mimpi 3D
Buku Mimpi 4D
Post a Comment