Showing posts with label Memory Box. Show all posts

Monday, March 9, 2009

KNIGHT not NIGHT and a COLOR challenge

Hello everyone! It's Monday again and time for another CCEE challenge. This week is the Catchy Name Featured Stamper challenge--where we select a person who has a "catchy" sign-on name on Splitcoaststampers and make cards for him and her based on that name.

This week Frances chose Jessie Rone (Knightrone). So, we had to make a card with a "KNIGHT" not a "Night" (as I was told many many times)! Giggle. No problem!

Here is my card:

Double points---because I have lots of "knight"s on my card and it is at night! (Just covering all the bases here!) Nanner, nanner, nanner girls---they were all waiting for me to mess this one up!

I used Kim Hughes' adorable Twinks the Owl for the main image and set him on a die cut flourish with the moon behind him. I typed out the bottom of the card on my computer interchanging "Night" and "Knight". I used the fabulous Harmony Rectangular Stamper Set from JustRite and the Brayton Font for the sentiment. I love how I can customize any card with this thing. Cannot wait to get my hands on the new vertical stamper so I can make sentiments along the side! You can find lots of JustRite products at Stamper's Dream (and at great prices too!)

You can see all the other fabulous KNIGHT cards on the CCEE BLOG!
Materials used: Stamps-Twinks the Owl (Kim Hughes); Brayton Font and Harmony Rectangular Stamper (JustRite); cardstock-black, white (Gina K Pure Luxury); Designer paper-Homespun (Memory Box); Cuttlebug and dots embossing folder (Provocraft); ribbon (Gina K Designs); Circle die (Spellbinders); computer; Copic markers; star punch (SU!); small star punch; QuicKutz flourish die; dimensionals (SU!).


Wanna Win a Stamp Set??
This week starts the previews of the newest Gina K Designs stamps sets. The "official" previews will begin tomorrow, but for today...here is a peek at some new digital paper that will be released. It is designed by Emily Giovanni! Isn't it beautiful?

Wanna will a stamp set worth $19.95 or less? Come on over to Stamp TV and play in my color challenge today. A random winner will be selected from all the participants next Monday! What have you got to lose?

The color challenge is to use black and any combination of pinks and reds that you would like. That is it! Easy!

You can find the challenge information HERE! Hope you will play along!

Materials used: Elegant Flowers, Botanical Dreams (Gina K Designs); Cardstock-black (pure luxury-Gina K Designs); Memento black ink; Digital paper-Rich & Shabby (designed by Emily Giovanni for Gina K Designs): ribbon (Gina K Designs); brads (Gina K Designs); Frame die (QuicKutz); corner rounder punch (Creative Memories).

Thanks for stopping by!

Tuesday, March 3, 2009

HOPPY Spring

I had to get in at least one MFTeaser before the big MFT blog hop Wednesday! So, here is a card that uses the newest Flopsey set called Tea with Flopsey. This guy is actually sitting under a tree with a tea cup in his hands in the actual set. But, because of his shape, I thought he would be perfect holding an Easter egg (the egg being the "o"!). I used Bling 'Bet for the sentiment and the Easter egg and "Easter" are from an older set called Hoppy Easter.

I love the happy colors!

Materials used: Stamps: Tea with Flopsey, Bling 'Bet, Hoppy Easter (My Favorite Things); Memento black ink; Copic markers; designer paper-Homespun collection (Memory Box); cardstock-white (Gina K Pure Luxury), pink (SU!); oval punches (SU!); sheer ribbon (Offray); Threading water punch (Fiskars); dimensionals (SU!).

My Favorite Things is having a New Release Cocktail Party on Wednesday, March 4th from 9-10 PM EASTERN. This month there are 5 new sets being released including a Who's that Girl who is hanging with her peeps! Head over to the MFT forum on Splitcoaststampers to find out all the details and to find out how YOU can be the next MFT Guest Designer. We hope to see you there on Wednesday night.

Don't forget to enter the HUGE MFT Idol Contest---check out this thread for more details how you can be crowned a MFT Idol and win a $250 shopping spree!

Thanks for stopping by!

Friday, October 24, 2008

LOVE Tags!

Just a little tag I created with My Favorite Things Boho Blossoms (one of my favorite MFT sets of all time!) The heart and sentiment are white embossed. The chipboard (SU!) tag is covered with this fun Memory Box paper.
I added some fun texture with the ribbon and the rhinestones, button and flower. Pretty easy...I love making tags---the perfect thing to create when you don't have lots of time!!!


Here is a close up of the heart detail!

Have a GREAT weekend! Mine is going to be BUSY!

Thanks for stopping by!

Thursday, October 9, 2008

Simple Elegance and a DREAMY challenge

Simple.

Sometimes these types of cards are my favorite.

I love how the brown "flourish" limb stands out amid the lightly colored background. I used the Resting bird image from Memory box and paired it with the Alpha background (because I saw the great Dave Brethaueer pair these stamps together and I love how they looked!)

Tip: In order to get the look of different hues on the background stamp, first ink the whole stamp in the lighter color (soft sky). Then, take a marker in a darker color (bordering blue) and outline the stamp and then run the marker along the bottom edge of each row of letters. When you stamp--you get a neat blend of the two colors. Very easy but neat results!

The sentiment is part of the Thanks stamp by Inkadinkado (very elegant--I love using it all together or just masking off the Thanks as I did in this card!)

Here is a close up of the card:


This picture shows the dimension of the middle layer with the flourish and the bird. I cut out the flourish and then embossed it with the mosaic embossing folder. The two light blue squares in the background are embossed with the textile embossing folder. A piece of May Arts sheer white ribbon adds a bit of elegance to this. Finally, I added a few Robin's nest water dew drops under the sentiment!

Materials used: Stamps-Resting Bird, Alpha Background (Memory Box), Thanks sentiment (Inkadinkadoo); ink-soft sky, blue bayau, bordering blue marker (Stampin' Up!); cardstock-vanilla, soft sky, blue bayau, close to cocoa (Stampin' Up!); Cuttlebug embossing folders-Textile, Mosaic (Provocraft); Cuttlebug (Provocraft); Robin's Nest water dew drops; May Arts ribbon; Quik Kutz flourish die; sponge; dimensionals (SU!).

You can find all of the stamps the ribbon and a great selection of embossing folders and Robin's nest dew drops at Stamper's Dream! Check it out when you have lots of time---Michelle has this store stocked with amazing things!

***And while you are at it---Check out the Stamper's Dream DREAMY challenge HERE. You could win an awesome prize just for playing along!!!***

Thanks for stopping by!

Friday, August 22, 2008

Best Fishes!

I love making circle cards.

I thought this awesome stamp from Impression Obsession would be perfect for one. The image is called Seascape and actually only has one fish. I wanted two in my scene so I stamped the image twice and cut out the fish from the second one to place on top of my image. The fish themselves are paper pieced from the yellow and blue paper I used on the card. I put the extra fish on a dimensional to give the scene a bit more depth.

The rest of the image is colored with Copic markers. I sponged the water around the main image.

The sentiment is also from Impression Obsession....and goes perfectly with a lot of their sea stamps. I used the Classic Flourish from Memory Box to create the blue design on the white circle.


I used my threading water punch to create a little top for the card. I think this design would be adorable for a Christmas ornament shaped card! (Did you know that Gina K Designs now carries the threading water punch?? Hooray!)

The image is colored with Copic Markers. I used stickles (turquise and frosted lace) to add some sparkle to the fish and the water. I also added some Robin's Nest dew drops on the scene. Finally, I added a bit of texture with the bubbles cuttlebug embossing folder and a frayed ribbon accent along the bottom.


Here is a close up of the image so you can see the bottom fish that is lifted off the scene. Hopefully, you can see a bit of the sparkle in this picture too!


Materials used: Stamps-Seascape and Best Fishes (Impression Obsession), Classic Flourish (Memory Box); cardstock-white, blue bayau; Designer paper-Cupcake (Basic Grey); Copic markers; sponge; soft sky and blue bayau classic stamp pads (Stampin' Up!); Brilliance black ink; white grosgrain ribbon (Stampin' Up!); Threading water punch (Fiskars); Creative memories circle cutting system; Bubbles embossing folder (Provocraft); Stickles-frosted lace and turqoise (Ranger); Nestability dies (Spellbinders); Cuttlebug (Provocraft); Robin's Nest dew drops; dimensionals (SU!).
You can find most of the products and all of the stamps for this card at Stamper's Dream store!
Don't forget to enter to win blog candy on this post!
Have a great weekend! Thanks for stopping by!

Thursday, August 7, 2008

Thankful Bird

I love this Resting bird image from Memoy box. It is just a beautiful design. I wanted to make an elegant card (since I have been making a lot of colorful and fun ones lately!)

I paired the image with the Thanks stamp from Paper Inspirations. I love this sentiment. You cannot see all of it on the outside of the card--I stamped half on the outside and half in the inside. It reads: Thanks (along the side) and then vertically says "For all the little things you do, and the thoughtful ways in which you do them." Pretty!

I used two of the outgoing Stampin' UP! incolors for this--soft sky and blue bayau. I will be mourning the loss of these two colors for a long time.


The flourishes on the front panel of the card are by Basic Grey. Stamper's Dream store did carry this set but Michelle is out of it right now.

I stamped Classic Flourish by Memory Box on the soft sky cs on top and bottom.


I created the scalloped pearl strip by using my Threading Water punch and then adding Pearl accents in the holes. Then I added the white sheer ribbon bow.

My favorite part of the card is the subtle shading on the bird. It is really easy to achieve too. Just stamp the image in the color you would like it to be. (I used Blue Bayau.) Then, take a sponge and mash it in the same ink pad. Then brush the sponge along the side of the cut out image. Be sure to brush harder in the areas you want more shadow. Here is a close up of the bird:


Here is a peek at the inside of the card. Remember the other half of that sentiment stamp---there it is!


All stamps and embellishments for this card can be found at Stamper's Dream store!

Materials used: Stamps-Resting Bird (Memory Box), Classic Flourish (Memory Box), Thanks (Paper Inspirations), Flourish stamps (Basic Grey); cardstock-white, soft sky, blue bayau (Stampin' Up!); ink-blue bayau, soft sky (SU!); paper piercing tool; Sakura stardust gellyroll pen; pearl accents; sheer ribbon (May Arts); sponge; Threading Water punch (Fiscars).
*****For those who emailed me regarding the clear box size I used in the Halloween treat container below---I purchased the clear boxes at clearbags.com--they are item number FB53 (dimensions 4 7/8 inches by 2 inches by 6 5/8 inches).

Thanks for stopping by!

Saturday, April 26, 2008

Happy Birthday Penguin

I haven't had enough time to just CREATE lately. I have been working on two requested publication pieces and doing write-ups for six others. But, I did manage to sneak a card in for the limited supplies challenge on Splitcoaststampers on Friday.

I used the adorable set called Penguins at Play by Memory Box for this card. This set has tons of images to create any type of penguin card you can imagine! I colored the images with Copic markers. Stampin' Up paper and stickers and ribbon complete the card.

When I first read the challenge, I thought it was to use ribbon and fiber scraps..which is what I did. I didn't pick up that the rest of the card should be made of scraps too....so now I am undercover, hiding from the challenge police! lol!

Materials used:Stamps-Penguins at Play (Memory Box); ink-brilliance black; turqoise cardstock, white cardstock, yellow cardstock, dp and stickers (Stampin' Up!); ribbon (SU!); silver cord (SU!); horizontal slit punch (SU!); circle punch (SU!); paper piercing tool and mat pack (SU!); Copic markers; dimensionals (SU!).

Thanks for stopping by!
Saturday, April 5, 2008

Warm Wishes!

Today I am sending some warm wishes to all of you who are still having cold weather (brrr!) I cannot imagine--it was 85 and HOT here today!

The butterfly stamps on this card are from Inkadinkado-Patterned Bugs Clear Stamp set. The sentiment is from Hero Arts Frames & Messages Clear Design Stamp Set. (I use these sentiments a lot!)

I stamped the butterflies once on white cardstock (with Brilliance black ink) and another time on vellum (with StazOn ink). After sponging the white cardstock with the Spring Moss stamp pad, I carefully cut out the butterflies from the vellum that I wanted to pop out. I added them on top of the white cardstock using small pop dots.

The background is Memory box paper that I lined up the swirls so that it looks like the path of that stray butterfly.

I popped up the sentiment and added silver eyelets and cord and finished it off with a little May Arts ribbon (my fav!).

The stamps, Memory Box paper and May Arts ribbon can be found at Stamper's Dream.

Materials used: Stamps- Patterned Bugs Clear Stamp set (Inkadinkado), Frames & Messages Clear Stamps (Hero Arts); white cardstock (SU!); Vellum (Paper Company); Sponge; Spring moss cardstock, ribbon, stamp pad (Papertrey Ink); brilliance black ink; Staz On black; label punch, circle punch, tab punch, corner ticket punch (Stampin' Up!); Cropadile; silver eyelets (SU!); silver cord (SU!); May arts black and white polka dot ribbon; paper piercing tool and mat pack (SU!); dimensionals (SU!).

Thanks for stopping by!

Saturday, March 8, 2008

Creative Cuttlebugging!

I LOVE my Cuttlebug machine! And, I am always finding different things to emboss or fun ways to make it go even further.

The following two cards show some fun ways to use that darling green machine!

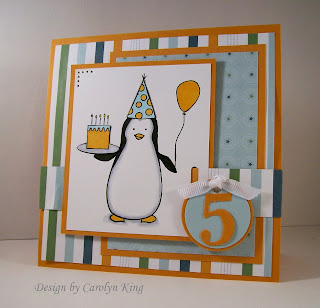
For the first card, I used the cutest set from Memory Box called "Penguins at Play." You can find this set at Stamper's Dream. The penguin is a stamp on its own and in the set there are TONS of accessories to dress the fella up! My next card is gonna feature him as a surfer!

I stamped the images and colored them with Copics. The paper is from Stampin' Up!

The fun Cuttlebug part on this card is......the number 5! See the number on the circle tag? Well, it is not a punch or a stamp----I used my Numbers embossing folder (also available at Stamper's Dream) and embossed a piece of orange cardstock. Then, I just cut around the embossed number five! What fun. I love the look of the numbers in this folder and I am so excited to have another way to use it!

Materials used: Penguins at Play by Memory Box; cardstock-white (SU!), orange (Paper Co.), designer paper by SU!; slit punch (SU!); Copics; circle punches (SU!); paper piercing tool; ribbon (SU!); Cuttlebug and Numbers embossing folder; dimensionals.

Then next card is a five minute one! (Always great for kid's cards!)

For this card, I used the Happy Birthday Folder in my Cuttlebug to emboss the background.

The fun Cuttlebug tip on this one is the dinosaurs. Well, they are the Cuttlekids dies (they ones that are only supposed to work in the Cuttlekids machine!) Well, I bought this set because my son LOVES dinosaurs and I thought this would be something I could use (if my plan worked!) to make crafts with him.

So, I bought the set and came home to try to use it. It didn't work......well, It didn't work the same way the other Cuttlebug dies do. All you have to do to get the Cuddlekids dies to work in your machine is use a C plate instead of the B.

For normal Cuttlebug dies the sandwich is as follows:
A plate
B plate
die facing up
cardstock
B plate

For the Cuddlekids dies the sandwich is as follows:
A plate
C plate
die facing up
cardstock
B plate

So go ahead and get those dies----they work! Woohooo!

The tag was created with a bling & dazzle tag from Gina K Designs. I covered the tag with orange cardstock and sanded the edges and added a Daisy Ds number rub on! Easy Easy!

Materials used: Cardstock-soft sky, ballet blue, old olive, orange (SU!); ribbon and silver cord (SU!); bling & dazzle tag (Gina K Designs); slit punch (SU!); Daisy Ds rub on number; Cuttlebug and Happy Birthday embossing folder; Cuddlekids die-dinosaurs; dimensionals (SU!).
Don't forget to add a comment to the post below to be entered to win my new set from Gina K Designs. I am loving reading all the responses.....some are right too!
*****Gina K Designs will be holding a new release party on Monday night on Splitcoaststampers in the Gina K Forum from 7-9 p.m. central time. There will be tons of prizes, challenges and fun! Hope you can make it!
*****And here is a FUN chance to win wonderful prizes while doing something for a FANTASTIC cause...check it out here!
Thanks for stopping by!