Showing posts with label Penny Black. Show all posts

Wednesday, April 13, 2011

Coloring Mimi: A Copic Marker Tutorial

Hello!! Today I am sharing a tutorial on coloring. After I created the card for my Penny Black guest designer spot, I received several emails asking what colors I used to color Mimi (especially her hair)... and how I created the end result. So...I figured it has been awhile since my last Copic tutorial...so I would just create one to show you how I colored her. (Note: I think I used different purples for her dress on this card than on my previous card. I had already sent the card out and could not remember so I just picked new ones!)
Supplies used: Stamp- Flowers for Mimi (Penny Black); Paper- Pure Luxury by Gina K Designs; Ink- Memento tuxedo black pad; Copic markers-- Cool Shadow BG10; Egg shell E50; Blush R20; Dull Ivory E43; Brick Beige E31; Sepia E37; Dark Brown E47; Chamois E35; Lavender V06; Amethyst V17; Mauve Shadow BV00; Frost Blue B00; Ice Ocean BG72; Chrome Orange YR04; Golden Yellow Y17; Yellow Green YG03; Pea Green YG63
Here we go: I stamped the image on Pure Luxury cardstock with Memento tuxedo black ink: Next, I used Cool Shadow BG10 marker to outline the entire image. This shade gives a nice subtle shadow around the image and adds a lot of definition. It is important to do this step first so you do not smear any other colors you will use later coloring the image:

I used Egg Shell E50 to color the entire face and her hands. Next, I added some Dull Ivory E43 around the edge of her face and along the hair line and two circles of Blush R20 on her cheeks. You can see this on the picture below. (I would normally use some Dull Ivory on the hands where they touch the sleeves but in such small areas, I typically don't bother.) Then I go back to the Egg Shell and move the marker in a circular motion over all the new colors to blend them:

The Hair: The more colors you use, the more realistic and beautiful color you will get for hair. I love blending lots of colors to get a unique look. For Mimi, I used Brick Beige E31 to color the hair. I just put on the color fast, not worrying about hitting every spot since many colors will be layered on top:

I used Sepia E37 to color some strands of hair and esp. the hair underneath that would have natural shadow:

Then, I went back to my Brick Beige marker to blend the darker brown into the lighter areas, again working in a circular motion:

For a big more drama, I used Dark Brown E47 to add a few more darker strands:

Next, I went back to my Brick Beige to blend again and I also added some Chamois E35 for some highlights that I didn't blend (Sorry this picture is a bit blurry...you might be able to see better on the next photo):

To color Mimi's dress, I used Lavender V06:


Then, I added some Amethyst V17 to add some shadows:

Instead of going back to the Lavender to blend the Amethyst in, I chose some Mauve Shadow BV00 to blend the darker color in, using circlular movement:

For the birds: I colored them with Frost Blue B00:
Then, I added some shadow with Ice Ocean BG72:
I went back to Frost Blue to blend:
I colored the bird beak with Golden Yellow Y17 and then added a touch of Chrome Orange YR04:
I colored the rest of the birds the same way.


Then, I colored the stockings with Yellow Green YG03 on every other stripe:
I used Pea Green YG63 to add some shadow (and because the space was so small, I didn't bother to blend it):

I went back to the Golden Yellow and Chrome Orange I used on the birds to color every third flower on the flower strand:
I used the Yellow Green and Pea Green again to color the next flower and then I left the other flowers uncolored:

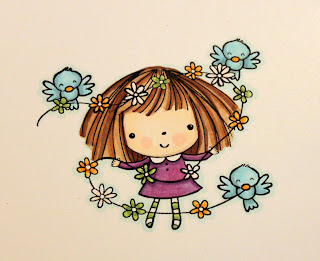
I used a Spellbinder's die to cut out the shape (sponged the edges with some sky blue ink) and added some metal dots to the flower centers:
Finished!


Instead of creating the same exact card, I changed it up a bit...and came up with this:
Total cutie Pie! Designer paper is by Echo Park.


Hope you enjoyed this tutorial. Feel free to post any questions if anything is unclear.


Have a great day! Thanks for stopping by!

Friday, April 8, 2011

Guest Designing for Penny Black Stamps

Happy Friday! So excited to start the weekend... AND so excited to be the guest designer on the Penny Black blog today! You can see all three of the cards I created for the blog HERE.
What fun it was to play with their stamps and create three different styles of cards. Their stamps range from cute and sweet to elegant. I just love the variety.
Here is a peek at one of the cards: I would love it if you checked them out and let me know what you think. Thank you for the honor, Penny Black!!!
Don't Forget---you still have time to enter to win the Echo Park Summer Days collection (post below!)
Have a WONDERFUL weekend. Thanks for stopping by!

Thursday, June 18, 2009

Have Faith Hedgie

I love Penny Black stamps---this one is called Asking the Flowers. This fella is just too cute.
I paired this stamp with JustRite Tiny Words & Centers sentiment. Instead of creating a standard card...I decided that it would be cute to create a mini card mounted on a base. So the hedgie part flips up so you can read the inside message.

<---Here is the card opened. For this card, I also used some Prismatics paper- Blush Red Light
and Island Mist Medium
and some fun May Arts ribbon.
The designer paper is from Kaiser Craft called Everblooming.

You can find all the supplies for this card at Stamper's Dream!

And some other fun news---Stamper's Dream now carries Tombow markers. Woohoo! I LOVE trying all types of coloring mediums, so I had to get a few to try them out! I will be posting with them soon!!!!

Thanks for stopping by!

Sunday, April 5, 2009

Just Ducky!

I *LOVE* ducks.

I love every duck stamp---so I HAD to have this adorable one called Lovin' & Huggin' by Penny Black. I got it from Stamper's Dream!
The background was created with the Labels I Nestabilities. I die cut one and then cut it down the middle, embossed it and then flipped them so that the flat middle edges were along the edges of the card. (It created the cute border at the top of the card.

The cardstock on this card is by Prism--I used the Orange pack, the accent Orange pack and the Island Mist pack. If you have never used Prism paper--you definitely should try it. It is beautiful and has a lovely subtle texture to it.

I used some Olive ric rac ribbon to line the bottom of the card. Almost everything on this card is from Stamper's Dream. Check it out for a great selection of stamps, ribbon, Spellbinders dies, JustRite products, embellishments, Prism Paper, primas, Cuttlebug folders, etc.

Materials used: Stamps-Lovin' & Huggin' (Penny Black), Expressions clear stamp set (Inkadinkado); Memento tuxedo black ink; Copic markers; Spellbinders circles, scalloped circles, Label I Dies; Cuttlebug; swirl embossing folder (Provocraft); ric rac (May Arts); buttons (SU!); paper piercing tool and mat pack (SU!); oval punches (SU!); corner rounder punch (Creative Memories); hemp; dimensionals.


Thanks for stopping by!

Friday, April 3, 2009

JustRite Week at Stamper's Dream

It is JUSTRITE WEEK at Stamper's Dream this week. Today, I am showing off some of the new JustRite products that Stamper's Dream is now carrying!

When I first saw that JustRite was coming out with a Vertical Stamper---I was soo excited. I love the Horizontal Stamper and use it all the time...but I also wanted to create a card with words or names along the side.....

Today is THE day! I created this card for my sweet niece who turns 1 TODAY! Happy Birthday Megan! (Miss you!)
This card was simple to create. I folded the cardstock over and then cut 1.25 inches off the top fold...so that when I stamped the name on the inside of the card using the Vertical Stamper and Brayton Font, it would still show when the card was closed. (YIPEEE!...I tell ya, it doesn't take much to make me happy!)

The great thing about both the Horizontal Stamper and Vertical Stamper is that they come with two blocks....so you can use whatever size fits your project best. I used the narrow block for the name above and it made it a cinch to align the letters.

I used the 2" Wood Stamper with bonus 15pt. font set & Center to create the arched "Happy Birthday" sentiment that frames the cupcake. I thought it would be cute to have the sentiment shaped around the flame and this set made it easy to do!

The cute image- CheeseCake Party -is by Penny Black and can also be found at Stamper's Dream. I colored it with copic markers and added a bit of Stickles to the flame.


This next project, a magnetic shopping list, also features the 2" Wood Stamper and Bonus 15pt Font & Center. This is the center image that is included. I used the letters to create the "Shopping List" around the main image.
Such an easy and useful project!

<-----Here is a close up of the top of the list so you can see it more clearly.
Michelle has all the new JustRite products in her store and is offering some fabulous blog candy to help celebrate!
Check it out HERE.
To see what the amazing Stamper's Dream Team has come up with, check out the schedule below and click on the names:
Monday - Kimberly and Michelle
Tuesday - Charmaine and Michelle
Wednesday - Denise , Kimberly and Michelle and Tosh
Friday - Kimberly , Michelle and me
Thanks for stopping by!

Thursday, March 26, 2009

Acetate Window Card

Hello everyone! Today I wanted to share a fun card I created last night (while watching Twilight!!!)
This card was designed around this cute Penny Black image called Cat on the Moon. I used a piece of acetate in the middle so the image looks like it is floating.
The image is stamped on Neenah cardstock and colored with Copics. I popped up the cat image so that I could dangle his tail below the main circle panel.
I colored and cut out the image, framing it with my Spellbinders die. Then I used a larger circle die to cut the opening in the front designer paper.
I used the same die to cut a circle in the card front. I assembled the card by laying a piece of acetate sandwiched between the designer paper and the card base (Island Mist by Prism). The image panel is adhered to the front of the acetate and the scalloped circle is adhered in the inside.

Very easy and a fun effect.

I used the Easy Brad Maker Kit by Chatterbox to create the center detail of the flower. I simply punched the circle with the smallest circle punch in the kit (THERE ARE THREE CIRCLES that come in this kit!!!) and used one of the clear epoxy crystal stickers over top! I added some fun Olive ric rac ribbon along the top to finish off the card.

Most of the products on this card can be found at Stamper's Dream.

Materials used: Stamp-Cat on the Moon (Penny Black); Memento black ink; Neenah cardstock; dp; Island Mist cardstock (Prism); acetate sheet; ric rac (May Arts); Easy Brad Maker Kit (Chatterbox); adhesive gemstones (dollar store); Prima flower; acetate; Spellbinders circle and scalloped circle dies; Cuttlebug (Provocraft); Copic Markers; dimensionals (SU!); corner rounder punch (Creative Memories).

Thanks for stopping by!

Saturday, March 7, 2009

Transported

Hi everyone! Happy Saturday!

Here is a cute "Thinking of You" card I created with the adorable Penny Black Transported bear . In the original stamp, the bear is holding onto a group of balloons. I thought it would be cute to make the sentiment the balloon so I changed it up a bit and added a sentiment from Expressions Clear stamp set by Inkadinkado.
Materials used: Stamps-Transported (Penny Black), Expressions Clear Sentiment set (Inkadinkado); Memento black ink; Pure Luxury white (Gina K Designs); designer paper-Homespun Collection (Memory Box); Copic markers; adhesive pearls (Kaiser Craft); paper piercing tool and mat pack (SU!), scalloped circle punch (SU!); oval/ scalloped oval dies (Spellbinders); Cuttlebug (Provocraft); dimensionals (SU!); hemp (SU!).

This is one way you can get a lot more mileage from your stamps. Stamp just part of the image for a whole different look! I colored the bear with Copic markers.

I pierced the edges of the blue designer paper and added some Kaiser Craft pearls at the corners. The ribbon is May Arts.

You can find all the stamps and embellishments on this card at Stamper's Dream. Check it out! Michelle is now carrying stamps from Flourishes, JustRite, Our Craft Lounge as well as fun embellishments from May Arts, Kaiser Crafts, Pebbles, and Chatterbox, to name a few!

Don't forget to enter to win the SU Blog Candy on the post below!

Have a great weekend! Thanks for stopping by!

Tuesday, April 29, 2008

Shadow Box Tutorial

One of my favorite types of cards to make is a shadow box card. I love the dimension they have and that they can be flattened for mailing.

I created this tutorial to show you how simple creating one is!

Materials you will need: (What I used is in parenthesis)

Two pieces of cardstock (Whisper white, Sugar Collection by Memory Box) 5" by 6"

Card stock to stamp image on (Whisper White- SU!) and any extra for embellishing (American Crafts-Pink)

Scor Pal

Image to stamp (Transported by Penny Black)

Scor Tape- 1/2 inch

Brads (White-The Paper Studio)

Ink (Brilliance graphite black)

Coloring tools (Prismacolor Pencils, Odorless Mineral Spirits, Twinkling H20s)

Foam tape (Dimensionals - Stampin' Up!)

(Hemp- Stampin' Up!)

Circle Die Cutting System (I used my Cuttlebug and Nestability dies, can also use Creative Memories Cutting System, Coluzzle, etc.)

Ribbon (May Arts-Pink)

(Oval Punches-Stampin' Up!)

Directions:

First, take the cut cardstock that will be the front and back of the card and score at 1/2 inch and 1 inch from each side (the scoring will be along the 5" side). After folding on the score lines, this is what it looks like. I use my Scor Pal for this and it makes measuring and scoring a cinch!


Then, put the back of the card aside. The next few steps are for the front of the card.

Place the front of the card on top of the C cuttlebug plate and position the Nestability die in the center of the cardstock. (For this step, make sure the circle will allow the image you are using inside to show through!) ****You can use any type of circle/oval/square die you want and any cutting system.

I place my die DOWN on the paper. I realize that this is not the correct way to use these dies with the cuttlebug but I do it all the time to get the perfect alignment. The dies will leave scratches on your plates as they typically do.

Cover with B plate and run through Cuttlebug machine.


The result will be this:

To create the scalloped border, use the same circle die as you did in the first step and cut a circle from cardstock. (Make sure there is ample room around the perimeter of the circle so you can cut the scalloped shape.)


Then, using a larger scallop die, place die centered around the circle. Use the die face down to get perfect placement.

Here is the result---a perfect scalloped border to frame your image:

Attach scallop frame to card front as shown:

Stamp main image on white cardstock. I used this darling image from Penny Black called Transported. (Thanks Michelle!) Color as desired. Cut out image and adhere to background piece with dimensionals or foam tape.


Add brad accents if you wish to the front side of the card (so that when you tape the front and back together, you do not see the brad prongs on the reverse side.)
Assemble the card by lining the side flaps with Scor Tape. Tape one side and adhere and then do the other side.


Add sentiment (I used this clear stamp from Hero Arts because it was the perfect size and fit the image well!)


Add ribbon (I used this pink ribbon from May Arts that I received as a birthday gift. Thanks Michelle!)


Whola! Done!
Here is a close up of the bear---I used hemp for the balloon ties and put the bear's paw on an extra dimensional so it looks like he is holding the ties.


Here is a view of the top of the box. This gives you a better look at how it was assembled.

I hope you enjoyed this tutorial. This was such a fun card to make and it is so simple. I definitely have to remember to make more of these!
Thanks for stopping by!

Monday, March 24, 2008

"HELP......

...the Zebra is going to EAT me!"


A classic moment from our Safari adventure this past week. My husband was driving and I had my daughter on my lap (don't worry I am not Brittany---it is a drive through where you literally go 8 miles an hour on a closed course and feed the animals that roam free! My other two monkeys were dangling out the back windows!)

Two fearless Zebras decided to poke their head INSIDE our car....needless to say Lauren was not pleased.

The rest of the day she kept repeating "It's ok.....Zebras are nice!" --That is what I kept telling her to calm her down.


Here are two projects I did last night---nice to get back to my stamping stuff!

The first card features an image and sentiment from Penny Black. The flowers are called Tigress. I colored them with Prismacolor pencils and then clear embossed them. They have a nice shine in real life.

I used my Nestability rectangle dies to mat and frame the image (I used gold cardstock for behind the flowers.)

The designer paper is from Memory Box Sugar Collection. I love the patterns in this pack.

The stamps and designer paper can be found at Stamper's Dream.


Materials used: Stamps-Penny Black (available at Stamper's Dream); cardstock-white, black, gold (Stampin' Up!); brilliance black ink; designer paper by Memory Box-Sugar Collection; slit punch (SU!); horizontal slot punch (SU!); black brads; Cuttlebug and Nestability dies; clear embossing powder, versamark pen and heat tool (SU!); dimensionals (SU!); ribbon (May Arts); Prismacolor pencils; odorless mineral spirits.

The next project is one I created with stamps and little clipboard set from Stampendous. The stamps are called "Clipboard Decor" and are made specifically to work with these mini clipboards (that Stampendous sells three different sizes in a pack--picture here!)

I used the largest clipboard and altered it to make a memo pad holder. I covered the clipboard with yellow cardstock. I flipped the base over and traced it on yellow cardstock and cut it out. Then, I covered the board with Modge Podge and adhered the measured cardstock on top and then sanded the edges.

I stamped the inside detail on white cardstock and cut it out and adhered it to the clipboard as well.

I used the stamps in the Stampendous set to create the border and the accent along the clip. The sentiment is stamped underneath the pad and I stamped it on the top of the pad to make it pretty for a gift presentation.

I attached a flower on the top of the clip to finish off the design. What an easy project. This would be adorable to leave by the phone or computer for messages or you could attach magnetic tape on the back and use it as a grocery list on your refrigerator.


Here is the view of the clipboard without the post it notes. The sentiment is also stamped on the base.

The clipboards and Stampendous Clipboard Decor stamps can be found at Stamper's Dream.


Materials used: Stamps- Clipboard decor by Stampendous; clipboard (Stampendous); bananna and white cardstock (Stampin' Up!); ribbon (SU!); large pop dot (SU!); button; flower (Paper Studio); Modge Podge; red classic ink (SU!); sanding block (SU!).


Thanks for stopping by!