Showing posts with label Echo Park. Show all posts

Saturday, May 6, 2017

Celebrate

Hello! Happy Weekend.  I managed to make another card for the Paper Smooches challenge this month:)  This month the challenge is to make a card with flowers...pretty easy!

And the card I made is filled with flowers.
For this card, I used some Echo Park paper and then I sprayed it with Heidi Swapp Colorshine (White).  I embossed the flowers from Blossoming Buds in white onto the paper and then embossed the flower banner and sentiment from Best Buds onto the same color paper and then die cut it.  I also die cut the shape from adhesive foam so that I could get some good overall dimension on the sentiment piece.  I added the sentiment over a die cut flag tag cut from some rose patterned paper.
I separated a piece of Twinery twine so that I was left with just white string. I added that to the card along with a few pink rhinestones.  I finished the card with a Kraft frame.


Paper Smooches products used on this card:

Hope you have a wonderful weekend:)
Cammie

Thursday, May 4, 2017

Confetti Flowers

Hello! Happy Thursday:)  Sorry for my absence...I try to make some time to squeeze a card in here and there but sometimes I don't get around to posting.  I am currently training to do a half marathon for my husband's Half Ironman.  (His back is not great and the running makes it worse so I told him I would do the half for him---who knew he would take me up on that offer?!?!)  Anyway, although I am not ever in horrible running shape....I started this training just two weeks ago because of the weather. So it might not be pretty!

I did make this little number this week--yay!  I really wanted to use this sweet pink confetti that my daughter Lauren got me for my birthday. She said, "You always stop and look at the glitter in Target so I got you these!"  So I wanted to use them asap:)

To get some inspiration, I looked at the newest Paper Smooches challenge---which is to create a card that has flowers.  Easy enough!  For this card, I used the mason jar with flowers from Best Buds but just trimmed off the mason jar.  I wanted a simple design for the confetti.  Lauren approves:)

Paper Smooches stamps used:
Pretty Phrases

Thanks for stopping by today!
Cammie

Friday, April 28, 2017

Colorful Showers

Hello!  It has been a BUSY week:)  Mostly all good things--->my daughter was in show, we had my parents and sister visiting, it was my birthday (29th of course 😉)....But then there was some not so good--->the stomach bug hit! ick!
 
Anyway.....seems like forever that I have been in my craft room.  I needed a little jolt to get the juices flowing so I turned to the Paper Smooches challenge for April.  The theme is "showers" so you could create a wedding or baby shower card or go literal and focus on rain, rainbows, showers, etc.
 
Here is my take:   
 
I stamped the city scene in black and white and then added the fun rainbow shower.  
Here are the Paper Smooches products I used:

 
Hope you have a wonderful day!
Thanks for stopping by-
Cammie


Thursday, April 20, 2017

Wish BIG

Good morning!  Ok...sorry.  ONE more cross stitch card.😏  It has been so fun playing with this Paper Smooches die that I have had a hard time putting it down:)  I tried a tougher stamped image on this one---was fun to try to figure out where to put shadows so he didn't look like a blob. 

For this, I die cut the grid then stamped the elephant image from Huge Hugs. Then, I used embroidery floss to fill in the color. 

Cross Stitch die
Birthday Sampler
Huge Hugs

Wishing you a FANTASTIC day! Thanks for stopping by!

Cammie

Saturday, April 8, 2017

Undecided

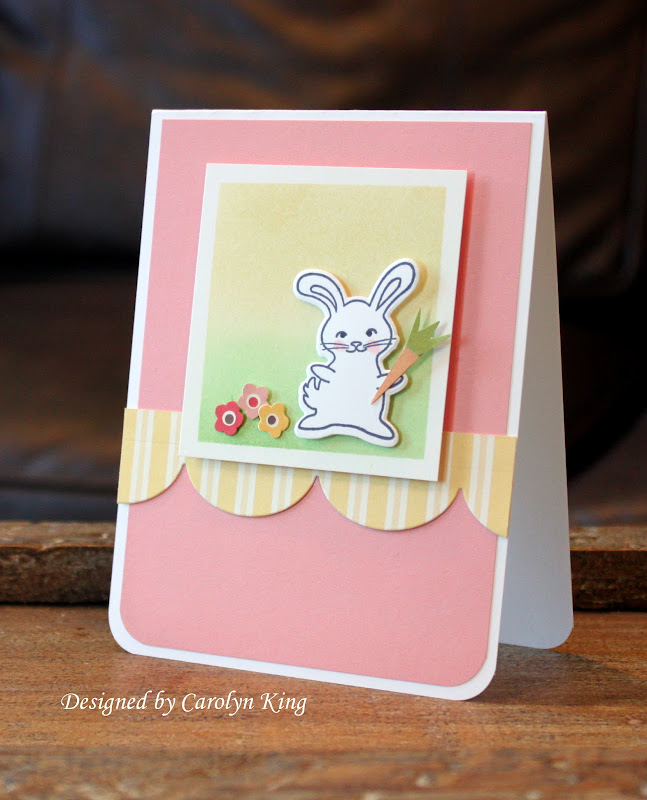
Hello!  Easter IS coming!  I created this hoppy little card using the adorable bunny from the Bold and Blooming Stamp TV kit.  The background was made blending distress inks (scattered straw, mowed lawn). Then, I stamped the bunny and die cut it.  I made the carrot with some paper scraps.

Since I wasn't sure what sentiment to use on this...I left it blank.  I kind of like it blank....but then I know it would look good with a sentiment filling up some of the inactive space on the bottom.   Alas.....I was not up to that big decision:)

I'll probably use this for Easter and add an Easter greeting on a flag on the bottom....  Left plenty of room 😂

Have a wonderful weekend!
Cammie

Saturday, March 25, 2017

Sketchy Bear

Hi! Just popping in quickly with a card I made for the My Favorite Things sketch challenge- MFTWSC25.  I used Friends Furever on this card...

I love doing sketch challenges especially when I feel unmotivated. They really jump-start creativity.  Have a wonderful day!

Thanks for stopping by-
Cammie

Wednesday, March 15, 2017

Giveaway winner and a Challenge card!

Hello! I have a few things going on today.  First.....I hope you enjoyed the Gina K Inspiration Hops on Monday and Tuesday.   If you missed it, you should take the time to go look at all the awesome creations the team posted.  I will be showing a lot more card ideas using the kit throughout the month.  Be sure to check back.

Next, I wanted to post winner from the giveaway last week!  Random.Cara chose number 23 as the winner. Congratulations to  reeree62 who said...

Love this card esp. the way you used the fun foam to pop up the flowers! I love getting inspiration to use my new Stamp TV Kit!!
Please email me (link on sidebar) with your address so I can send that package out to you!  Thank you so much for playing along.

Finally, I wanted to post a card I created for the Paper Smooches challenge this month.  This month, the challenge was to use GREEN.


I used Adorable Array die and Hello Love die (I just snipped the word from the heart) on this card.  I also used Flag Tags for the sentiment:

Super fun because I LOVE green!  I have another card I did for the challenge that I haven't photographed yet...so I'll be back:)

Thanks so much for stopping by!
Cammie

Monday, October 17, 2016

Hello Friends

Hello! Playing again with My Favorite Things Cute Critters stamps.  I ended up die cutting and stamping a lot of these guys and I spend the time at my daughter's tennis lessons coloring them.  Then, I just have to pop them on a card....once I figure out how I want to use them!

And here is basic sympathy design I came up with using stamps from Gina K. Designs (large flower, sentiment) and My Favorite Things (small flower). The large bloom is embossed in white and then I die cut and stamped the two colors on the small flower and popped it up.  I embossed the sentiment and then just added some hemp and a piece of washi tape in the background.  I like the simplicity of it.

Hope your October is going well. Do you decorate for fall or for Halloween?  I love it but never make it too scary because I am a wimp.  I have been spending a lot of time getting the house ready for the Halloween festivities.  Pictures to come :)

Thanks for stopping by!
Cammie

Wednesday, September 28, 2016

Gasp! More cards...

Hello! Me again---I know....twice in one week:)  I will get more creative with my post titles once I get used to this again.  Right now, I am just having fun delving into all the stamps and dies that I have gotten in the past year but have not had time to use.

First up is a birthday card which uses My Favorite Things Birthday Sentiments and Lucky Stars Dienamics. I also used some star stamp outlines from Out of this World because it was sitting on my desk and I thought a few stars among the die cuts would go well.
For this card, I placed the stars (not pulled apart) on the cardstock front and die cut them.  Then I pieced cardstock scraps behind the cut out stars. I stamped the fun sentiment in Memento Love Letter ink and added some Twinery twine and a few rhinestones:


The next card features one of my favorite sets: Cute Critters from My Favorite Things.  I die cut and stamped the raccoon, colored him with Copic markers and popped him up. I die cut the hearts using Tag Builders #5. The patterned paper is from Echo Park (Sweet Day). I sponged the edges of the card with some Tea Dye Distress ink. Finally, I added a bit of Twinery twine to the bottom of the card:
Thanks so much for stopping by!

Cammie

Thursday, February 14, 2013

Valentine's Inspiration

Hello! Happy Valentine's Day!
Since today IS Valentine's Day----I figured it would be a good day to share some Valentine-y projects--- :)

First up--A set of Valentine's cards using SRM Stickers:


Next--A Beary Cute project --tutorial is in this week's Crafts 'n Things Weekly:
There are a lots inspiring projects in every issue!  Be sure to sign up  for Crafts 'n Things Weekly to have all the creative ideas delivered to your inbox every week!

Thanks for stopping by! xo

Tuesday, December 25, 2012

Merry Christmas!

Wishing you and your family a very Merry Christmas!

 
 Thanks for stopping by!

Tuesday, December 18, 2012

Hug Your Children!

Hi there!  Today is my son's 10th birthday.  Hard to believe that just 10 short years ago this guy came into our lives!  I cannot imagine my world without him.  Happy Birthday Ben!

With the recent tragic events in Newtown, Connecticut, I am reminded more than ever what a gift our children are.  After several days just feeling very depressed...I saw this on Facebook and I got some comfort from it so I thought I would share it:

Twas' 11 days before Christmas, around 9:38
when 20 beautiful children stormed through heaven's gate.
their smiles were contagious, their laughter filled the air.
they could hardly believe all the beauty they saw there.
they were filled with such joy, they didn't know what to say.
they remembered nothing of what had happened earlier that day.
"where are we?" asked a little girl, as quiet as a mouse.
"this is heaven." declared a small boy. "we're spending Christmas at God's house."
when what to their wondering eyes did appear,
but Jesus, their savior, the children gathered near.
He looked at them and smiled, and they smiled just the same.
then He opened His arms and He called them by name.
and in that moment was joy, that only heaven can bring
those children all flew into the arms of their King
and as they lingered in the warmth of His embrace,
one small girl turned and looked at Jesus' face.
and as if He could read all the questions she had
He gently whispered to her, "I'll take care of mom and dad."
then He looked down on earth, the world far below
He saw all of the hurt, the sorrow, and woe
then He closed His eyes and He outstretched His hand,
"Let My power and presence re-enter this land!"
"may this country be delivered from the hands of fools"
"I'm taking back my nation. I'm taking back my schools!"
then He and the children stood up without a sound.
"come now my children, let me show you around."
excitement filled the space, some skipped and some ran.
all displaying enthusiasm that only a small child can.
and i heard Him proclaim as He walked out of sight,
"in the midst of this darkness, I AM STILL THE LIGHT."

Written by Cameo Smith, Mt. Wolf, PA
***
Aside from spending more time with family and all the normal holiday hustle, I am taking a little time to get my CHA projects done so they are ready to ship AND I am anxiously awaiting the Jan Gina K Release----you are gonna love it! 

Here is a project I had in a recent Crafts 'n Things weekly:


Supplies: Plastic Craft Water Globe- Celebrate It! (Michael’s)
Buffalo Snow Flurries
Star Stick Pin- Little Yellow Bicycle
Baker’s Twine- Honeydew (The Twinery)
Sentiment sticker- Winter (SRM Stickers)
Patterned paper- Dots & Stripes: Ruby Red, Small Dot (Echo Park Paper)
Silhouette 3d Christmas Tree file (by Lori Whitlock)
Silhouette MachineEnjoy!

Make sure to sign up to receive Crafts' n Things Weekly in your inbox.  It is filled with great ideas and it is FREE!

Hug your babies every chance you get.  Thanks for stopping by!


Thursday, December 13, 2012

SRM Holiday Card Ideas

Hope you are enjoying your December.  It has been a crazy month already!  My son had to have a molar tooth pulled on Tuesday.  The dentist wanted to pull it because it does not have an adult tooth and the baby tooth had a root canal and a cap placed on it when he was younger. So, they didn't anticipate it lasting long.   The hope was that they would pull it and the other molars would start tilting forward and then braces will just pull the teeth into alignment.  But, when we got there...the procedure took a lot more time than we had planned because that little tooth had fused with the bone.  Luckily, the dentist got it out (along with a piece of the bone!)  Ben did great (much better than I did!) but I think the whole process aged me a few years :)

Yesterday I spent the day at the mall...and still feel like I haven't accomplished much:(  But it was fun! (At least more fun that watching your child have a tooth yanked:)

Anyway.....here are a few more holiday card ideas using SRM Stickers:
This first card features Sticker Sentiments: Happy Holidays along with some Echo Park paper (Happy Days: Red, Springtime: Lemonade, Robin's Egg; For the Record: Green) and a layered chipboard snowflake (Season's Greetings-Echo Park).

Next--A little Peace on Earth:

I used  Sticker Sentiments: Happy Holidays (SRM) on this card also.  I combined it with some fun patterned map paper (Wayfarer by Bazzill Basics) and some Echo Park Papers.  The dies are from My Favorite
Things (Paper Doll border Dienamics) and The Cat's Pajamas (Heart).

Thanks for stopping by!
 

Tuesday, December 4, 2012

Gina K Designs Inspiration Hop Day 2

Hi!! Ready for Day 2 of the Gina K Designs Inspiration Hops?  Here we go...

Welcome to another fabulous Inspiration Blog Hop! Gina and the Design Team hope to inspire you with many beautiful ideas with the newest Gina K releases! And, as you hop through their blogs, make sure to leave a comment on each of them because we will choose a few random comments and those stampers will each win a grab bag of Gina K. Designs products! To see the full list of winners check the Big News forum at Stamp TV a few days after the hops.

Today, the design team is sharing projects created with Elegant Florals and Sentimental Holiday. Here are my projects for today-

First up- a tag featuring Elegant Florals:

I love these silhouetted stems.  And I love tags. Put them together---I am one happy gal!  I added a bit of Jute twine to the top of the ribbon on this tag.

...And another card using Elegant Florals:
 
For this card, I changed up the color palette and made a more colorful creation.  The stem is stamped using Memento tuxedo black ink on Ivory cardstock.  This one is easy card to mass produce!

Next, a card using Sentimental Holiday:
I clear embossed the snowflakes from the set on Kraft cardstock.  I embossed that gorgeous sentiment with white embossing powder and then I punched out the snowflake shape and adhered some black vinyl under it to keep with the neutral palette.  The base is Pure Luxury ivory cardstock.

..And another card with Sentimental Holiday:
This card was super simple---just stamped the tree using Memento Cottage Ivy ink on Pure Luxury white cardstock and then used a black pen to draw the border around the edge of the card.  I stamped the sentiment in Memento tuxedo black.  Then I stamped the stars in Memento Cantaloupe and Memento Dandelion.  I punched a star to add to the tree and topped it off with a rhinestone.

That is it for me today.  Head on over to these blogs to see some amazing projects: 
 Thanks for stopping by!

Tuesday, November 27, 2012

Joy Ornament

Hello! Whew!  I took a long break---and it was so nice:)  The kids go back to school today.  My youngest already told me twice yesterday that she is going to miss me a lot today because she will be away from me all day again :(  Guess we had too much fun! 

Anyway, I am slowing getting back into my craft room as I have had little time to fit much in between putting up the Christmas decorations and visiting with family.  I do have an easy ornament project to share today, however.

Remember the advent calendar I made a few weeks ago?  I had several tins left over from it and thought they would made cute ornaments.  Here is the first one I made:

 
I used Echo Park- This & That: Christmas chipboard on the inside and paper to frame the outside edge using Spellbinders circle and scalloped circle dies.  I used an SRM sticker (Fancy Sticker Sentiments: Christmas) to layer over the outside of the tin.  I punched a hole in the top of the tin using a Cropadile and then threaded the hemp through to create a hanger.  A little bit of Marashino baker's twine and a heart stick pin (Little Yellow Bicycle) finish off this easy project.

Speaking of baker's twine---Did you see the two new colors that The Twinery just released---Platinum Shimmer and  Gold Shimmer? Heavenly!  Might have to give some of that away soon ;)

Thanks for stopping by!

Sunday, November 18, 2012

Handmade Holidays Hop


Hello! Today is Day three of the Handmade Holidays Blog Hop going on over at The Twinery Blog.  The Twinery, and many other amazing companies,  have teamed up to bring you a hop filled with special HANDMADE gift ideas for the holidays.


Today is the last day of the hop, so you will want to be sure to head on over to The Twinery blog to be sure to stop at all the blogs participating.
While you hop, be sure to leave comments at all the stops along the way because each company is giving away prizes to random participants.
The Twinery is giving away:

 3 spools of baker's twine in your choice of colors
{$48 retail value}

Before you go, I have a project to share that uses product from The Twinery, Fiskars and Tombow (three of the wonderful companies sponsoring the blog hop!).  It is a stocking perfect for presenting some holiday treats or gift cards.

First, I cut the stocking design using a Silhouette file (Lori Whitlock).  I adhered the pieces together using Tombow Permanent Adhesive Dots Tape Runner.  I added the lace border along the top using the Interchangeable Border Punch Starter Set by Fiskars and the Lacy Doubles Interchangeable Border punch cartridge. Then, I punched holes all along the scalloped edge of the stocking:
 
I used my Fiskars Original scissors to cut some Peapod baker's twine so I could thread it through the holes in the stocking.
 
I used these snowflake punches by Fiskars to decorate the stocking--Medium Lever Punch Snowflake and Medium Lever Punch White Christmas. Then, to add some dimension to them, I used some Tombow Mono Aqua liquid glue to apply a large dot of glue in the center.  After wrapping a section of Peapod baker's twine, I added it to the glue:

Finally, I punched the Fiskars XXL Lever Punch TAG to complete the stocking gift.  I added an SRM sticker (Fancy Sticker Sentiments- Christmas) to it.  Here is the finished project:
 

Hope you like it! Thanks so much to Fiskars and Tombow for the wonderful products to work with!

Thanks for stopping by!

Friday, November 9, 2012

Cardmaker Blog Team - Xyron Blog Hop

Hello! It is time for another Cardmaker Blog Hop.  The Cardmaker girls received some awesome products from XyronThanks Xyron!  So we are having a blog hop today to show off the cards we made.

Here are the Xyron Products I used on my projects today: 
the Creative Station: this product blows my mind!
 
the Mega Runner: the best tape runner I have used


Creative Station---> Since I am a figure-it-out-yourself-and-if-you-run-into-problems-look-for-a-video kind of person :), I found a great video on how to use the Creative Station on the Xyron Video page.  It is a cinch!  You can also find wonderful ideas and inspiration on their Blog.

My machine came loaded with permanent adhesive inside.  Just place the item you want to make sticky all the way into the machine (as shown), crank the handle clock-wise and the items come out the other side.  When they come through the back, press the clear bracket down and slide the blade across to cut the paper. (NOTE: The paper will be sticky on the back so always put the side you want to be sticky facing down into the machine.)


Then you end up with something that looks like this:
All you do from this point is use a bone folder or press over every area of the image to ensure you will get the sticky on every part and then peel the clear film off and you  have die cuts that are sticky!  This is HUGE for someone like me (who uses a lot of intricate die cuts and uses my Silhouette machine non-stop!)

But, with this same machine you can change out the Permanent Adhesive cartridge to add in a Repositional Adhesive, a Magnet backer (great for creating magnets from photos); a Laminate Cartridge, and a Laminate/ Permanent Adhesive Cartridge (which has laminate on top and the adhesive on bottom.) Love that!

Here are a few projects I made with the Xyron products:
For the first one, I used the smooth-as-butter Mega runner to add paper to a chipboard tag.  To create the glittery ornament, I die cut it using my Silhouette machine (Ornament Set: Samantha Walker).  Then, I took the ornate cut and ran it through my Creative Station to apply adhesive to the back.  Placing the sticky side up I sprinkled glitter all over the die cut.  The glitter attached to EVERY spot of the diecut and did not come off.
I ran the die cut through the Creative Station again (glitter side UP!) to get perfect adhesive coverage on the back of it so I could attach it to the ornament base that I cut from neutral cardstock.  After assembling the ornament, I added some rhinestones and pearls before adding to the tag:


Next, I have a card using glitter again.  I created the card base by adhering the patterned paper to the card using the Mega Runner.  After I die cut the tree image (Samantha Walker: 3 Christmas trees: Silhouette), I ran it through the Creative Station one time to add the glitter.  Then, I used the Glue Stick to adhere it to the card base.  Then, I added the glitter tree on top using foam tape to get some dimension. I am lovin' the glittery tree!:

Here is another very ornate die cut image that I cut using my Silhouette (Birds on a Branch by Hero Arts) that I have avoided using because I didn't want to try to add liquid adhesive to the back of every leaf and I was sure a tape runner would rip it.  It was simple using the Creative Station:
Finally, here is another quick card using an intricate snowflake die (from The Cat's Pajamas), sentiment from Simple Snowflakes (Gina K Designs).  The snowflakes were run through the Creative Station and then added to the card:

Head on over to these blogs to see what the rest of the Cardmaker girls made with their Xyron products:
Cardmaker Blog
Anya
Colleen
Glenda
Jennie
Trudy

Thanks to Xyron for the wonderful products featured on today's post!  Thanks for stopping by!