Showing posts with label Ranger. Show all posts

Saturday, April 8, 2017

Undecided

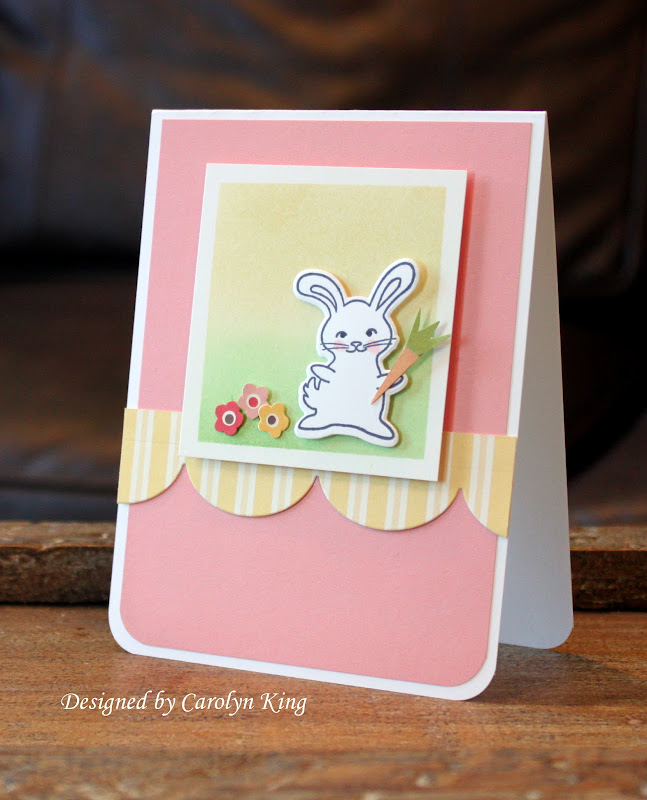
Hello!  Easter IS coming!  I created this hoppy little card using the adorable bunny from the Bold and Blooming Stamp TV kit.  The background was made blending distress inks (scattered straw, mowed lawn). Then, I stamped the bunny and die cut it.  I made the carrot with some paper scraps.

Since I wasn't sure what sentiment to use on this...I left it blank.  I kind of like it blank....but then I know it would look good with a sentiment filling up some of the inactive space on the bottom.   Alas.....I was not up to that big decision:)

I'll probably use this for Easter and add an Easter greeting on a flag on the bottom....  Left plenty of room 😂

Have a wonderful weekend!
Cammie

Wednesday, March 22, 2017

Purple Rain

Hello! Today I have a card to share using the Bold and Blooming Stamp TV kit.  I posted this on the Gina K Stamp TV Facebook page and someone asked for the steps on how I made it so I listed that below!
Here is the card, that I lovingly named "Purple Rain." 


Here are the supplies I used for this card

Adhesive: tape runner, foam mounting tape
Paper: Bristol Smooth (for the mounted layer); Gina K Designs Pure Luxury white cardstock (base)
Ink: Ranger Distress Ink (Seedless Preserves)
Blending tool
Heat tool
Clear embossing powder
Versamark
Spray bottle: I used Tim Holtz Distress Sprayer
Stickers: Sticker Stitches (SRM Stickers), chipboard mini flower (Colorbok)
Stamps: Bold and Blooming Stamp TV Kit (Gina K Designs)
Corner rounding punch

Instructions:
1.  Emboss one large flower, and a few medium and smaller flowers with clear embossing powder on Bristol Smooth cardstock (as you can see in picture.)  I did one or two flowers at a time so I wouldn't by accident rub off the embossing powder before I set it.
2.  Use your blending tool and rub the distress ink all over cardstock.  Wipe the areas with the flowers with a paper towel.
3.  Spray paper with water using spray bottle and then lay a paper towel over it. Pat and then remove.  (This step removes a little of the ink where the water drops fell giving it the rained on look.)
4.  Cut this panel so that it is smaller than base layer. Since my card is 4.25" by 5.5", I cut this piece 4"  by 4.5" (since I left a large section blank for sentiment at bottom.)
5.  Round top corners and adhere this panel to card base. Line the top edge up with the card leaving a little margin of white at top.  After you adhere your layer you can round the top corners of the card base.
6.  Add a thin scrap of yellow paper across the bottom where the panel edge ends. Make sure you leave ample room for the sentiment.
7.  Stamp sentiment stamp (in Stamp TV kit) using the Seedless Preserves ink on the bottom center of card. 
8.  Add the sticker stitch on the yellow border paper.
9.  Stamp the large flower on scrap paper in Seedless Preserves ink and die cut with die in Stamp TV Kit. Add it to card as shown using foam tape.  Add chipboard flower sticker to center of flower.

That's it! Pretty easy.

Have a wonderful day!
Cammie

Monday, March 20, 2017

Floral Thank You

Good morning! Getting the weekend started after a fun weekend:) My kids are off today so our weekend is extended a little--which is always a bonus!

Wanted to pop in and share another card I made with the Gina K Designs Bold and Blooming Stamp TV kit.  I just love this kit!  

I stamped the flowers in light ink and then colored them using Copic markers and die cutting them with small rectangle dies.  I sponged the edges with Ranger linen ink. The floral design was embossed in white and then I added the Thank You stamped tag. I finished this card with a bit of The Twinery twine!

Have a wonderful day--Thanks for stopping by!
Cammie

Thursday, March 16, 2017

It Ain't Easy Being Green!

Hello!  I am back again with my other two cards for the Paper Smooches challenge.  Yes, I said two.  I might have said one yesterday....but I made another last night so I figured....what the heck?! 


The challenge this month is to use any shade of green on a card.

Both of my cards use Huge Hugs stamp set--but I used them in different ways.  For the first, I sponged the background using Ranger Distress inks (seedless preserves, mowed lawn, antique linen) and I used Tim Holtz's Rays Layering Stencil to get the look of the sun rays in the background. (Obviously, it is a setting sun because I have the stars out 😏)

I stamped the big guy and colored him with Copics and stamped the sentiment on a scrap paper sponged with the same antique linen ink:

Next, I made a card with the same set but a different feel....
Ha....this guy makes me laugh so I couldn't resist adding a google eye to him :)

Thanks for stopping by!
Cammie

Tuesday, March 14, 2017

Gina K. Designs - Stamp TV Kit Inspiration Blog Hop - Day 2


Hello! I am back again with the Cast and Crew for Gina K Designs. Welcome to another fabulous blog hop celebrating the new StampTV Kit! We hope to inspire you with some beautiful card projects as you hop along to each of the designer’s blogs!


Today, we are featuring the first stamp set called Happy Spring. These stamps are so cute and perfect for spring! We are also showcasing the incentive set available this month called Through Thick and Thin. You will be able to create amazing card projects using these beautiful stamp sets!


Enjoy the gorgeous inspiration samples from the team and then comment on each blog for your chance to win a $20 Gina K Designs gift certificate! To see who won, check the Big News Forum at StampTV a few days after the hop. Ready for some inspiration? 

Here are a few of the projects I have created for today’s hop:

First up, is this cute spring greeting I created using this set and also the flowers from the other set in the kit.   I sponged the background (Ranger- Picked raspberry, mustard seed, peacock feathers) and then sprayed it with water and removed some ink with a paper towel.  I die cut the branch and then stamped and die cut the bird before coloring it with Copics and adding it to the card.  I stamped the flowers and added them to the branch.    I finished this by embossing the clouds and the sentiment in white:

Next, I again sponged the background with some yellow and green and then used a Copic marker to add grass.  I stamped the flowers, colored them with Copics and then die cut them and added them to the card.  I stamped the sheep in light ink, colored it and then die cut it before popping it on the scene.  I added a strip of patterned paper from the kit under the main panel and stamped the sentiment in black ink:


Finally, here is my sample with the incentive set- Through Thick and Thin.  To create this card, I stamped the flower in purple ink (Ranger- seedless preserves) and then used the ink cube to water color the flower.  I did the same with the leaves.  Then I sponged the background with Ranger- mustard seed ink and stamped the sentiments, embossing the word "friend" for emphasis.  I added a strip of the patterned paper to the bottom of this card as well:


Ready for more awesome creations?! Just click on the links below for more from Gina and the Cast and Crew:

Carolyn King (you are here!)

Don’t forget to pop over to the Gina K Designs Store and check out all of the new products available this month in the “What’s New” section at http://www.ginakdesigns.com.

Thank you for stopping by!

 Cammie 

Friday, March 10, 2017

Colorblocked Flowers and Blog Candy :)

Hello hello! Happy Friday!  Posting a little later than usual because I don't have my act together today:) 
Sigh.  My head was wrapped around Spring weather--and BAM! 3 inches of snow---->  Back to hiding under the blankets by the fire.

Well, today I have a few fun things to share that will cheer one lucky someone up:)  But first, here is a fun card I made using the new Bold and Blooming Stamp TV kit from Gina K Designs.  I am guest designing for Gina this month and will be part of the team blog hop on Monday and Tuesday.  You don't want to miss it--there will be lots of inspiration using this fantastic new kit.

Here is my card:
 
I stamped the flowers on pure luxury white cardstock and then colored them with Copic markers.  Then I die cut them using the dies in the kit.  I also die cut some adhesive foam (found at my local Michael's store in the felt aisle) with the dies to give the flowers some lift.  The background was sponged using Ranger distress inks (seedless preserves, mustard seed, peacock feathers). This panel was popped onto some wild lilac cardstock and distressed around the edges. I tied some Twinery twine around the main panel before adhering it to the cardbase using Scor-Tape.

Now onto the fun-  One lucky subscriber will get this little assortment.  It's always fun to get new goodies to play with.  Included is ...Grey Skies Happy stamps set (Unity Stamps Co.), Little Branches stamp set (Gina K Designs) and Party On stamp set (Gina K Designs).  I am also including a full size Ranger Distress Oxide Fired Brick stamp pad:)  Fun!  Ok. Since this is a subscriber only contest, Please only enter if you subscribe to my blog feed.  (Any subscription service is acceptable.)
Just leave a comment on this post by Wednesday, March 15 at 6 am. EST.  Random.Cara will pick a winner and it will be posted so be sure to check back to see if it's you! Good luck!

Thanks for stopping by today!

Cammie

Thursday, March 9, 2017

Simple Birthday

Hello! Just popping in to share a card I created for a challenge on StampTV.  The challenge was to create a card with one layer and sponging.  For this card, I taped off the square with washi tape and used two blue inks (Ranger distress inks- peacock feathers, salty ocean) to create the gradient background before embossing the flower in white on top.  I stamped the sentiment (Gina K Designs-Stately Flowers 8) in the two blue inks as well.  Simple!

Thanks for stopping by!

Cammie

Wednesday, March 8, 2017

Can't Wait to Hug You

Hello! Busy week this week--I am gearing up for a fun release blog hop next week with a company I love!
But, I thought I would pop in and share this card that I made this week.  I used My Favorite Things  Friends Furever and True Friends on this card.  I sponged the background with Ranger Distress inks (scattered straw, picked raspberry, seedless preserves and black soot) and then sprayed water on the background and removing excess with a paper towel.  I embossed the sentiment in white.  Final touches were the punched stars and washi tape on the bottom.


Have a great week. Be back soon!
Thanks for stopping by!

Cammie

Saturday, February 4, 2017

Pretty in Pink

Hi there!  Hope you are enjoying your weekend:)

Popping in to share another fun birthday card (that could also be used as a Valentine card!).

For this card, I die cut the Celebrate Word using adhesive foam for the sentiment and just popped it over the background that I created by clear embossing the script (Stampin' Up! from 10 million years ago) and then sponging Picked Raspberry distress ink over it.

One balloon was a chipboard sticker that I had sitting on my desk and I paired it with a balloon I stamped with Let's Celebrate stamp set in Memento Dandelion ink.  I die cut it it using the Celebrate Balloons die.

I trimmed a strip of the panel and added that along the bottom of the card just above the Sticker Stitches from S.R.M.

Off to get the day started....

Enjoy your day! Thanks for stopping by!
Cammie

Monday, October 29, 2012

Gina K Designs Inspiration Blog Hop Day 1

The Gina K. Design team welcomes you to another fabulous Inspiration Blog Hop!!! Be prepared to be inspired as you check out all the stops on this hop.  Make sure to leave a comment at each stop along the way because we will choose a few random comments and those stampers will each win a grab bag of Gina K. Designs products! To see the full list of winners check the Big News forum at Stamp TV a couple of days after the hops.


Today, the design team is showing projects made with - Stately Flowers 5  and  Vogue Vases 2!
Here are my samples using Stately Flowers 5:
For my first card, I stamped the mistletoe in Cottage Ivy ink (Memento) on Ivory cardstock.  I used a red marker to ink the sentiment and then inked the edges of the cardstock using some Tea Dye Distress ink (Ranger).  The background is This & That Christmas patterned paper (Echo Park) and some washi tape.

Next, I have a card featuring the stunning sunflower in the set:
I stamped the flower in Memento tuxedo black ink on white cardstock and then colored it with Copic markers (Flower- Y11, Y17, YR16, E23;  Flower center- E37; Stem and leaves- YG11, G21, G94, YG63; shadow- BG10).  The edges are inked with Tea Dye Distress Ink (Ranger). I used some Copper Stickles in the center to give some texture to the flower.  I stamped a sentiment from Vogue Vases 2 underneath.


Here are my cards featuring Vogue Vases 2:
 
For my first card I used one of the solid vases to create a balloon.  I used Memento Love Letter ink to stamp it.  I used one of the blooms from the flower arrangements to add a flower to the hot air balloon.  I just cut a little square from Kraft cardstock to make the bottom of the balloon.  The sentiments from the set were stamped all inside the flags on the side using Memento tuxedo black ink.  (I used the cloud stamps from Hello Sunshine set and stamped them using Bahama Blue Memento ink!)

Next, I have a simple design using some of the greenery from the set:

I embossed the stems in white on red paper and then punched the circle shape to add to the white cardstock. (The stamped design along the bottom is from You Say Goodbye and I Say Ello!) 

That's it for me today....
But you can head on over to these amazing blogs for more Gina K inspiration:
Thanks for stopping by! See you tomorrow for another Inspiration Hop!

Wednesday, September 19, 2012

Cardmaker Blog Hop- Graceful Leaves

Hello!  Welcome to another Cardmaker Blog Hop.  This month's theme is Graceful Leaves---cards celebrating the first day of autumn with leaves in golden colors.  Here is my card:

 
Yippee! I love fall!

For this card I used the the Gina K Design's set Fall Foliage (that was a stretch, I know!) and created the leafy background using all the beautiful leaves in the set.  I combined inks to get a beautiful combination of fall colors--just like we are starting to see here in PA :)  
Here are the inks I used for the leaves:  Memento Morocco, Memento Dandelion, Memento Cottage Ivy, Memento Rhubarb Stalk, VersaMagic Gingerbread dew drop, Antique Linen Distress Ink (Ranger).
To keep with the fall theme...I backed the sentiment with a scrap piece of burlap to add texture.

I cannot wait to see what the rest of the team came up with!  Are you ready for some autumn inspiration?  Check out these blogs:
Carolyn (you are here!)

Thanks for stopping by!

Monday, September 17, 2012

Tag Wall Calendar

Hello! Happy Monday! Thanks so much for all the comments and emails from my last post.  I just love my super fabulous blog friends!
Last year I created a wall calendar made up of tags that hang on this birdcage in my kitchen.  I decided to update the tags for 2013 since it has been a big conversation piece in my house.  The tags feature SRM Mini Calendars and a LOT of other SRM stickers (listed below!)  You can see in the detail pics all the other stickers I used (including lots of border stickers!) Here is the finished product that was on the SRM stickers blog last week:


SRM Stickers used:
Stickers by the Dozen- Valentine’s  #62004
We’ve Got Your Border- Halloween  #57005
Express Yourself- St. Patrick’s Day #42036
Freestyle Winter #50001
We’ve Got Your Border- Valentine’s #57007
Mini calendar 2013 Standard #48009
Mini calendar 2013 Decorative #48008
Sticker Sentiments- Life is Good #51014
Year of Memories 2013 #48007
Express Yourself- Water Fun #42039
Express Yourself- Graduation #42019
Quick Card- Class of 2013  #52043
Express Yourself- School #42020
Other supplies used are from these companies: The Twinery, Ranger (Distress inks), Gina K Designs, My Favorite Things, Bella Blvd, October Afternoon, Little Yellow Bicycle, Echo Park Paper, My Little Shoebox, Lori Whitlock (Penguin Silhouette Shape).

Thanks for stopping by!

Tuesday, September 4, 2012

A True Friend

Hello! Happy Tuesday!  Since we celebrated labor day here in the states yesterday, this is going to be one of those weeks that I am always a day off!  YES, I had to double check the day before typing that!

Well, today I have a card to share that I have worked on little by little.  I was trying to play along in the Moxie Fab Challenge: The Asymmetry Challenge.  In doing so,  I discovered that when you create a design that happens to turn out asymmetrical, that is one thing....but trying to create something asymmetrical is quite another.   I started off in several different directions but finally went with this design.   I like that the sentiment is in black to draw your eye toward it, with only a few other small details on the card being black to keep your eyes focused on the important part :). Otherwise, every other element was in 12 different positions before they were finally glued in their final place.  

Supplies: stamps- My Favorite Sentiments (My Favorite Things);  cardstock- Ivory (Gina K Designs);  Patterned paper- Escape Collection (Little Yellow Bicycle); baker's twine- Ocean (The Twinery); sewing machine; ink- tea dye distress ink (Ranger), Memento tuxedo black (Tsukineko); ribbon-Offray; flower and pin- Wild Orchid; rhinestones- Recollections (Michael's).

Have a great day! Thanks for stopping by!


Tuesday, July 10, 2012

Gina K Inspiration Hop Day 2

Hello again!   The Design Team for Gina K. Designs welcomes you to another fabulous Inspiration Blog Hop!!! As you hop through the blogs, make sure to leave a comment on each of them because we will choose a few random comments and those stampers will each win a grab bag of deeply etched, pre-cut Gina K. Designs stamps! To see the full list of winners check the Big News forum at Stamp TV a couple of days after the hops!!
Today we are working with the new sets: Tropical Nature and I Do!

Here are my samples:
The first card features I Do!
I folded over a printed shaped frame to create the card base.  I stamped the fella in tuxedo black ink (Memento) to make a fun anniversary or wedding day card.  I added a little flower made out of twine on his lapel.  I stamped the 4 ever sentiment in Fired Brick ink (Ranger).

Next, I used the "+" and "=" from the I Do! set and coupled them with the images and sentiment from Tropical Nature to create this equation:
I stamped the pineapple and then added a little drink straw with a black pen and then stamped the trees. Since I was using clear stamps I was able to separate off the "in the sun" sentiment from the rest of the sentiment so I could stamp it by itself.  (This is one of the benefits of clear stamps...you can make a quick vertical cut to use it in pieces and then you can place it on the block back together to use as a whole sentiment again!)
Fun sets! ugh?

Check out all the amazing designs and inspiration from the rest of the team:
 Thanks for stopping by!