Showing posts with label Martha Stewart. Show all posts

Sunday, April 18, 2010

Gina K Preview Day 1 and a Farewell

Hello! Welcome to the first night of Gina K Previews. Tonight the design team is showing you their creations with Gifts from the Sea and Oh Boy!

But first, I want to let you all know that I have stepped down from the Gina K design team. Last month was my last "official" month on the team. This decision was very tough for me and I assure you it was for one reason ONLY -----> to lessen my mandatory work load at this time. My baby starts kindergarten in the fall and I really want to cherish these last few months of having a little one home. Gina is absolutely amazing and I have no doubt that we will still be working together a lot! I am so grateful for her friendship and I will still be around peeking some sets here and there (like today!) and posting lots of Gina K goodness on my blog. Thank you, Gina! LOVE you lots!

Now...onto the stampy stuff! Here are two creations I made with Oh Boy! The first is a nursery wall decor piece. I love all the transportation images in this set and think it would be so cute to put each one in a frame for a collection of wall art. I created one with the sailboat:
I painted the wood frame with some white paint. Then, I created the scene with lots of paper piecing----I paper pieced the sailboat with some paper and did the same with the clouds and sun. I layered the sail and sun for some dimension. I popped up a few layers and added some (wonky) stitching and a little button.
You can see some of the dimension/detail in this picture:

Materials used: Stamps-Oh Boy! (Gina K Designs); Memento tuxedo black ink; designer paper-Baby boy mat pad (Martha Stewart); slit punch (SU!); hemp; cloud stickers (Martha Stewart); button; white paint; unfinished frame; sewing machine.
Next, I created a birthday card using the truck image in the set. This truck can be used for TONS of cards just by filling the back with different things (ie. hearts for an anniversary card or furniture for a moving card.) I love that it has so many possibilities!

I paired this image with some Joy Ride dp and chipboard. I free hand cut the clouds and added some tiny dots for fun. The truck is colored with Copic markers.

Materials used: Stamps- Oh Boy! (Gina K Designs); white cardstock (Gina K Designs); Copic markers; Memento tuxedo black ink; ribbon (SU!); designer paper- Joy Ride (Cosmo Cricket); Ready Set Chip-JoyRide (Cosmo Cricket); black pen.


Designers Participating in previewing tonight:

Melanie Muenchinger - Gifts from the Sea illustrator

Tami Mayberry - Oh Boy! illustrator

Gina Krupsky

Jessica Fick

Carolyn King

Cathy Tidwell

Donna Baker

Emily Giovanni

Erika Martin

Kurtis Amundson

Lee Murphy

Lynn Mercurio

Nina Brackett

Theresa Momber

Valerie Stangle

Geri Utterback - our Center Stage Spotlight Designer!


The Release Party is this Thursday, April 22 on StampTV. There will be challenges, contest questions, chatter, as well as tons of samples from the Design Team members from 7-10 (central time) all leading to the new products being available in GinaK's online store at 10pm.

Thanks so much for stopping by!

Tuesday, April 6, 2010

PC Sketchy Hop

Hello! I am sooo very honored to have been asked by my sweet stamping friend Maren to join in on the Paper Crafts Go-To Sketches blog hop today!!! Maren and I met in person for the first time a little over year ago and I consider her one of my closest stamping buddies . I just *adore* her.

Today, you will see some fresh new cards created with some of the amazing sketches the fabulous Go-To Girls created for Go-To Sketches. In addition, you will be entered to win it by commenting on each of the participating blogs listed below!!!!!!!!! (Leave a comment on each blog to increase your chances of winning!) Three winners will be selected from all the entries!!!

The comments will close at midnight on Thursday, April 8.

Here is one of Maren's awesome sketches from the book:
Here are my takes on the sketch--

For this card, I created the card base and then cut another white mat slightly smaller than the card and embossed it with the textile embossing folder. I inked the edges with Sahara sand ink and attached it to the base.
I cut a small rectangle of designer paper and stamped the foliage stamp from Signs of Autumn (Gina K Designs) all over it in the same sand ink. I stitched the edges and attached it to the die cut designer paper shape.
Then, I stamped the sentiment with pumpkin and black ink. I added a strip of designer paper along the bottom and a piece of ruffled ribbon along the side. I adhered the sentiment on the panel with foam mounting tape.
I punched the butterfly out of the same orange designer paper and added some adhesive pearls.
Finally, I attached the panel to the card base.
Materials used: Stamps- Friends, Signs of Autumn (Gina K Designs); cardstock-white (Gina K Designs); ink- Sahara Sand, Pumpkin pie (SU!), Memento tuxedo black; Butterfly punch (Martha Stewart); Designer paper- Everafter: Something blue, Something old, Something new (Cosmo Cricket); adhesive pearls (Prima); ribbon (May Arts); Spellbinder labels four die; Cuttlebug (Provocraft); textile embossing folder (Provocraft); sewing machine.

and another...
I cut the card base from blue cardstock. I used a die to cut the curved rectangle from some October Afternoon designer paper.
I applied the rub on to the white mat. Then I die cut some felt to apply over the flower shapes for more texture. I tied a ribbon around the panel and added the sentiment sticker over the ribbon. Finally I added a button with a hemp tie and some rhinestones. Then I assembled the card, putting the section at a slight tilt for fun!
Materials used: Rub on-Farm Fresh (October Afternoon); sentiment sticker - Farm Fresh shape stickers (October Afternoon); Designer paper- Farm Fresh 8 By 8 paper pad (October Afternoon); felt (Papertrey Ink); flower blossom dies (Papertrey)Cardstock- white (Gina K Designs), Hawaiian shores (Papertrey); gemstones (The Paper Studio); ribbon-(Papertrey); button-)Papertrey); Spellbinders die-Curved Rectangle; Cuttlebug (Provocraft).
I know you want to win this beautiful issue from Paper Crafts. So don't forget to leave a comment!!!
....And then head on over to these inspiring blogs and leave a comment to increase your chance to WIN!
Amy Sheffer http://pickledpaperdesigns.blogspot.com/
Carolyn King http://myblogbycammie.blogspot.com/ (You are here!)

Thanks so much, Maren, for the amazing chance to play along with your sketch! Love ya!
Thanks for stopping by!

Monday, February 22, 2010

JustRite Week at Stamper's Dream

Hello! It's is JustRite Week at Stamper's Dream this week. Today, we are using the newest JR releases on our cards. I used Joyful Hearts Borders & Centers on both of my cards today:

I stamped the sentiment and left the ink off the "love" so that I could replace it with a Maya Road chipboard love that I colored with an orange Copic marker. This sentiment works so well with all the JustRite botanicals or any fun designer paper you may have.

Materials used: Stamps-Joyful Hearts borders & centers (JustRite), Sending thoughts (Jillibean soup); Memento tuxedo black ink; mini chipboard love (Maya Road); Designer paper- Grandma's Christmas Soup: can tomato soup; Soup Staples: orange sugar; Alphabet Soup: Vegetable Juice (Jillibean Soup); cardstock-creme de menthe, white (Gina K Designs); cork paper; jute twine (Gina K Designs); adhesive rhinestones (Recollections); slit punch (SU!).
Next, I created this simple design using another beautiful sentiment in the set:

Materials used: Stamps-Joyful Hearts Borders & Centers (Justrite Stampers); Memento tuxedo black ink; label punch (SU!); glitter lace hearts (We R Memory Keepers); ribbon (SU!); white cardstock (Gina K Designs); designer paper-Soup staples: blue sugar (Jillibean Soup); corner rounder punch; scallop lattuce border punch (Martha Stewart).

I love the Joyful Hearts sentiments because they work so well alone or complementing other stamps you already have.

Here is the week's schedule:
Monday: Cam , Amy, Laurie and Dawn
Tuesday: Cindy, Denise, Tosh and Michelle
Wednesday: Silke, Cam, Tosh, Michelle
Thursday: Denise, Amy and Laurie
Friday: Dawn, Cindy and Michelle


Thanks for stopping by!

Wednesday, November 11, 2009

Thanks Veterans and Calendar HOP!


First and foremost----Happy Veteran's Day! Thank you to all those who have served or who are currently serving our country. Hugs to my hubby, who is in an "undisclosed location in Asia." (his words verbatim).
<<-----Hubby in action. If this photo doesn't make you feel secure......then I don't know WHAT will! (giggle!)
*****

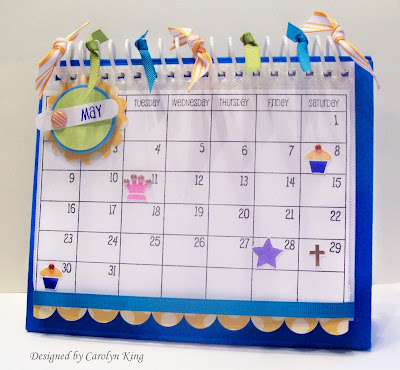
Gina K Designs is releasing two new sets by Tami Mayberry tonight---Calendar Bits & Pieces and Calendar Grid. The grid is just that---a grid that you can add the calendar dates to---or use for fun invitations or save the date cards. Calendar Bits & Pieces includes TONS of stamps to fill in your calendar or create scrapbook pages, cards, etc.

I created two projects today to try to show you the versatility of these sets. I am sure you will see LOTS of ways to use them on the hop tonight.

First, I used the Calendar Grid to create the fun background of this card. I used the words from the Bits & Pieces set to create a sewn on sentiment:

Materials used: Calendar Grid and Calendar Bits & Pieces (Gina K Designs); bashful blue ink (SU!); white cardstock, tan leather cardstock (Gina K Designs); designer paper-Early Bird-Cosmo Cricket; flower stickers (Martha Stewart); buttons (Making Memories); ribbon-Funky Vintage Trims, Lizzie (Making Memories); sewing machine; slit punch (SU!).

Next, I created a desk calendar using the Grid in a traditional way:I found a stand up photo album at Dollar Tree and thought it would be perfect to alter for a desk calendar. All the little stamps and the words and numbers are in the Bits & Pieces set. Wouldn't it be cute to create holiday desk calendars for grandparents with photos of the kids on the backs of the pages? There are endless possibilities with these sets---Check out these links for more:


For some helpful tips on how to use the Calendar Bits & Pieces and Calendar Grid stamp sets, please be sure to check out Gina's blog and StampTV for a helpful video on just how quick and easy it can be to use! Both of these sets as well as the PDF version of the Calendar Grid image will be available for purchase tonight over on our online store.

After that, stop by our Illustrator's blog - Tami Mayberry for some projects with her stamp sets.
Here are the Gina K Designers who are joining us in the preview tonight:


You'll also want to check in on these CenterStage Spotlight Designer's blogs for more ideas:

Thanks for stopping by!


Friday, October 16, 2009

Lord of the Season Blog Hop

Hi There! The kids and I are loving having some company. What a great diversion for them to have their grandparents here....and adult company is always nice for me!

Tonight, the Gina K Design team is hosting a blog hop featuring the gorgeous new set by Nina called Lord of the Season. I chose to use more funky colors for this card--to illustrate that the images do not have to be used for formal cards only!
I used some of my favorite designer paper from the White Out collection (We R Memory Keepers) to paper piece the tree. I added some fun red dots for ornaments. I inked the edges of the sentiment piece to go with the pop of blue throughout the card.

Materials used: Stamps-Lord of the Season (Gina K Designs); Memento tuxedo black ink, turquoise ink (SU!); sponge; cardstock-pure luxury white (Gina K Designs); Designer paper-White Out Collection (We R Memory Keepers); lattice border punch (Martha Stewart); Corner rounder punch (Creative Memories); Spellbinders scalloped rectangle die; Cuttlebug (Provocraft); ribbon (May Arts); star punch (SU!); red adhesive dots.

For even more ideas with Nina Brackett's Lord of the Season stamp set, visit her blog link below as well as the GinaK Idea Center here: Lord of the Season

GinaK Designer's joining in on the hop tonight:


September's Center Stage Spotlight Team:

Nina's Guest Designers:

Thanks for stopping by! Have a GREAT weekend!


Wednesday, August 26, 2009

Lotsa Flowers-Gina K Preview Day 3

Hi! Today is Day Three of the Gina K Designs Previews!!! Hope you have liked all the previews so far. Here are some more!!!

First up--I created this card with the newest set from Theresa called Autumn Beauty:Wait until you see all the exquisitly drawn images in this set---they are so pretty and perfect for fall. But today...I wanted to create a happy "hi" card featuring the mailbox image.

The main image is colored with Copics and I added a Sakura Stardust pen to add shimmer to the flowers.

Materials used: Stamps-Autumn Beauty (Gina K Designs); Memento black ink; Copic markers; alpha stickers; Sakura Stardust pen; Designer paper-Night Light-Jack (October Afternoon); cardstock-white (Gina K Designs), turqoise (Stampin up!); Spellbinders dies; button (SU!); ribbon (SU!); twine (Gina K Designs).

Next, I created this card with the new sentiment set from Nina called Elegant Verses. Nina released the GORGEOUS Elegant Post set last month (while I was on vacation) so I was only too happy to ink them up together. The verses work perfectly with her Post set but also will complement many other stamps you already own.
First, I inked up the post in the Elegant Post set, but instead of stamping it the way it was designed....I rotated the post horizontal so that I could create a long hanging bar for the flower basket.
The flowers are colored with Copics. I added some tiny black crystals for the basket holder and a tiny little gingham bow to complete the panel.
I used the Flowers sentiment from the Elegant Verses set and highlighted a part of it in blue. The verse reads "Flowers seem intended for the solace of ordinary humanity." Love that!
I used Pure Luxury white cardstock and Black onyx pure luxury cardstock on this card.
Materials used: Stamps-Elegant Verses, Elegant Post (Gina K Designs); Memento black ink; Copic markers; Cardstock-white, black onyx (Gina K Designs); turquoise (SU!); Copic markers; Martha Stewart lace punch; Crystal Imaginisce rubons & Rhinestones-Always & Forever; Mark Richards crystal stickers.

To see more inspiration with the stamps previewed today, visit Gina's blog, the illustrator of Tropical Blooms as well as Theresa Momber, the illustrator of Autumn Beauty, and Nina Bracket , the illustrator of Elegant Verses.

For even more projects with tonight's two stamp sets, these Senior Design Team Members are participating in previews today: Asela, Carolyn, Cindy, Donna, Emily, Erika Jessica, Kurtis, Lee, Lynn, and Melanie as well as our CenterStage Spotlight Design Team members:Shelly Wilson and Charlene Merrick

Our Release Party starts Thursday night at 7 pm CST. Please join us for contests questions, challenges, lots of chatter as well as a ton more samples shared by the Senior Design team members and our CenterStage Spotlight team too. See you tomorrow night!

Thanks for stopping by!

Thursday, June 25, 2009

Gina K Preview Day 3-Release TONIGHT!

Hi! Welcome to the last day of Gina K new release previews. All the new stamps and accessories will be released at Gina K Designs TONIGHT at 10 p.m. CENTRAL time.

Today the design team is previewing the last two sets that will be released: The Journey by Asela and the new One Free with Three set-Many Wishes.

Here is the card I created using The Journey:

I paired this AWESOME truck image with some of the new Soft Sand Pure Luxury cardstock and this beautiful sentiment to create this scene.

The country road is torn designer paper and I inked the edge with some distress ink and a sponge. The rest of the card is pretty self explanatory. This truck is so much fun to play with!!

Materials used: Stamps-The Journey (Gina K Designs); Memento black ink; Copic markers; Cardstock-White, soft sand pure luxury (Gina K Designs); embossing powder, white and clear; Versamark, heat tool; paper piercing tool; Ranger distress ink -tea dye; sponge; Martha Stewart fence punch; ribbon-(May Arts); Spellbinders ribbon slider die; Cuttlebug (Provocraft); designer paper-Zoom Collection-Wheels (Crate); olive marker (SU!); felt cloud (Martha Stewart); corner rounder punch (Creative Memories).

Now head on over to these amazing blogs to see some more peeks:

Gina, Asela, Cathy, Cindy, Donna, Emily, Erika, Jessica, Joanne, Kurtis, Lee, Lynn, Melanie, and Theresa
Our CenterStage Spotlight Design Team members Selma Stevenson and Pam Imholz are joining us this morning with previews as well!

Release Party TONIGHT: Join us here in our forum on this thread-TONIGHT---Thursday, June 25th from 7-10 PM Central Time for all the fun! Then at 10 PM central time, we will release 6 new stamp sets, new Pure Luxury card stock and some great new accessories! Gina will be giving away lots of freebies too, including templates and digital paper! We hope you'll come and party with us!

Thanks for stopping by!

Wednesday, April 22, 2009

Gina K Preview Day # 3, a tutorial and blog candy

Contest closed. Random.Cara selected #96 as the winner. Congrats to " Sharon Harnist said...
Great new set, Cammie -- so versatile!"

Congrats Sharon!

Hello everyone! Welcome to Day 3 of the Gina K Designs Previews. The design team has been previewing all of the new sets that will be available after the release party on Splitcoaststampers from 7 to 10 p.m. Central time on THURSDAY!

Today...it is time to reveal my new set.....NURSE Feelgood! I KNOW a few of you guessed this ....but what you did NOT know is that this set is not JUST for nurses.

About a year ago, I illustrated Doctor Feelgood for Gina K Designs....and it was always my intention to do a counterpart--a nurse. However, I did not want to create an image that could only be used for nurses...so I designed a stamp set that can be a nurse...but also can EASILY be transformed into a doctor, paramedic, dentist, PA, vet, teacher, mother and any thing else you would use a female image for.

Here is my first card featuring the nurse as she was originally drawn. There are lots of sentiments in the set that can be used for many occasions. One of the sentiments is the "I {heart} my...." and you can fill in the blank with some professions included or add your own.

In honor of Nurse Appreciation Week (May 6-12, 2009) I created this:


The sentiments, nurse and ambulance are all part of the set. The images are colored with Copic markers. I repeated the sentiment behind the matted image to create a fun background.


The nurse image is fantastic to thank a nurse for nurse appreciation or for caring for a loved one; or it works well to send a fun card to a significant other (there are sentiments for that in the set too!); and it also is great to create cards to send to nursing friends and relatives.

Here is the ambulance used on its own on a card-
I paired this image with a sentiment from Doctor Feelgood. The ambulance on its own is great for an EMT or for a fun valentine or anniversary card. The sentiment reads "Love is the best medicine." So, for this card, I covered up the ambulance cross with a fun felt heart.

Removed for Publication


But, this set can be used for so much more....very easily. Because of the way I drew the image, it is simple to alter it to be used for tons of other cards. I only have a nurse hat on her head to distinguish her as a nurse. I opted to put papers in her arms so that she can be ANYTHING you need her to be. Check out how EASY it is to change her:

1. Simply ink up the stamp. (I used Memento tuxedo black ink.)


2. Then, use a damp Q-tip to rub off the ink on the hat. (Gina K's stamps are deeply etched so it is simple to take off ink on one part of an image and the stamped image is always so crisp!) Then, go over the area once more with a dry Q-tip to ensure you removed all ink.

Here is the stamp with the ink removed off her hat--- so easy!

3. Stamp image on cardstock. Whola! She is no longer a nurse. (Just add the little stethescope in the set and she becomes a doctor. Add an apple in her hands and she is a teacher. Put her in front of some animals and she is a vet. Put a tooth image behind her and she is a dentist. Put a child or flowers or a stuffed animal in her hands and she is a mother. Put a graduation cap on her head or stamped in the background and she is a graduate.....The possibilites are endless.)

You can use the same technique to change her hairstyle...or simply add more length to it.


Here are two cards I created to show you the transformation. Here she is as a teacher:

For this quick card, I wanted to show you this set paired with two others from this release: Wee Tees and the One Free with Three set called Notes to Mom. (One Free with Three set is the set you receive FREE this month when you purchase three other sets!!) It is filled with gorgeous sentiments that you will use over and over again!
You can see more Previews of Nurse Feelgood or Notes to Mom on these blogs today:

In the Spotlight Designer for Gina K Designs
Beverly Cole


Blog CANDY! Leave a comment on this post to be entered to WIN a NURSE FEELGOOD set!!! Random.Cara will pick a winner on Thursday night at 8 p.m. Central time! (Subscribers can post twice.) Winner must contact me within three days of winning.

Thanks so much for stopping by! I hope you like the new set!

Saturday, March 28, 2009

Best Friend

Hello! Happy Saturday!
I will be running around a lot today...still trying to catch up from our vacation last week. One of the things on the agenda today is my daughter's softball game (I am one of the coaches.) Wish us luck!

I was going though a drawer of stamps and found this adorable set Framed Friends (by Asela for Gina K Designs). I knew I wanted to use the pup stamp, which I hadn't had a chance to use yet.

This is what I came up with:
I love the fun paper by 3 Bugs in a Rug--it goes well with the image, I think. I used the Martha Stewart fence punch for some added detail.

Materials used: Stamps-Framed Friends (Gina K Designs); designer paper-Playtime Striped, Playtime (3 Bugs in a Rug); Memento black ink; Copic markers; ribbon (SU!); Pures luxury white cardstock (Gina K Designs); corner rounder punch (Creative Memories); dimensionals (SU!).

Have a wonderful day!
Thanks for stopping by!


Wednesday, March 4, 2009

MFT Blog Hop

Hello! Welcome to the My Favorite Things blog hop! If you didn't start at the beginning and want to see all the awesome new MFTeasers, head over to Kim's blog!

For my MFTeaser, I created a little journal with the Nite Nite Ellie set. I love this set, not only because of the adorable images, but also because $2 from every set sold for the first six months will be donated to St. Jude's Hospital for Children! Too cool!

I used my Bind-it-All to create this chipboard book. I cut inside pages the same size as the covers and added some dividers created with the label punch.

I paper pieced the little girl's pajamas and colored the rest of her with Copic markers. The felt pieces are by Martha Stewart and I had some pink star ribbon that I just cut apart to layer on top of some of the felt stars.

As a final touch, I added some white Flower Soft to the bunny slippers and the collar of her pajamas to make them fuzzy!

Materials used: Nite Nite Ellie (My Favorite Things); Memento black ink; Copic markers; Flower Soft (white); adhesive pearls (K & Company); designer paper-Cosmo Cricket and Stampin' Up! ; cardstock-white (Gina K Pure Luxury); Bind-It-All and black binding wire (Zutter); chipboard (Zutter); label punch (SU!); Martha Stewart felt shapes; star ribbon; ribbons (SU! and MFT); slit punch (SU!); paper piecing tool and mat pack (SU!); dimensionals (SU!).

******Now head on over to Susie's fantabulous blog to continue the journey....

My Favorite Things is having a New Release Cocktail Party on Wednesday, March 4th from 9-10 PM EASTERN. This month there are 5 new sets being released including a Who's that Girl who is hanging with her peeps! Head over to the MFT forum on Splitcoaststampers to find out all the details and to find out how YOU can be the next MFT Guest Designer. We hope to see you there on Wednesday night.

Thanks for stopping by!

Monday, February 9, 2009

KRAFTY CCEE Tag

Hello everyone! Happy Monday (again!) Time again for another CCEE challenge. This week Tosh was in charge and her challenge was a color challenge. We had to use PINK, KRAFT, and WHITE. Ugh! This was very challenging for me.

I decided to create a fun Spring tag that would be cute attached to a white gift bag for a birthday, Mother's Day or Easter.
The white cardstock is Pure Luxury and the Kraft is from Stampin' UP!. I used a piece of designer paper from Cosmo Cricket for the pink. The main image is from Gina K's Baskets of Happiness. I stamped the image twice-once on the circle and once on white cardstock that I cut out and colored with Prismacolor Pencils and Copic markers.

The bottom design is from the Martha Stewart Lace Punch. I added some Sakura Stardust pen over the flower blossoms so they sparkle. The Kraft panel behind the main image is embossed using the Cuttlebug flowers folder. I used my Spellbinders circles and scalloped circle dies to frame the main image.

Check out the fabulous creations the rest of the CCEE group created HERE. Hope you will play along!

Thanks for stopping by!