Saturday, February 4, 2017
Pretty in Pink
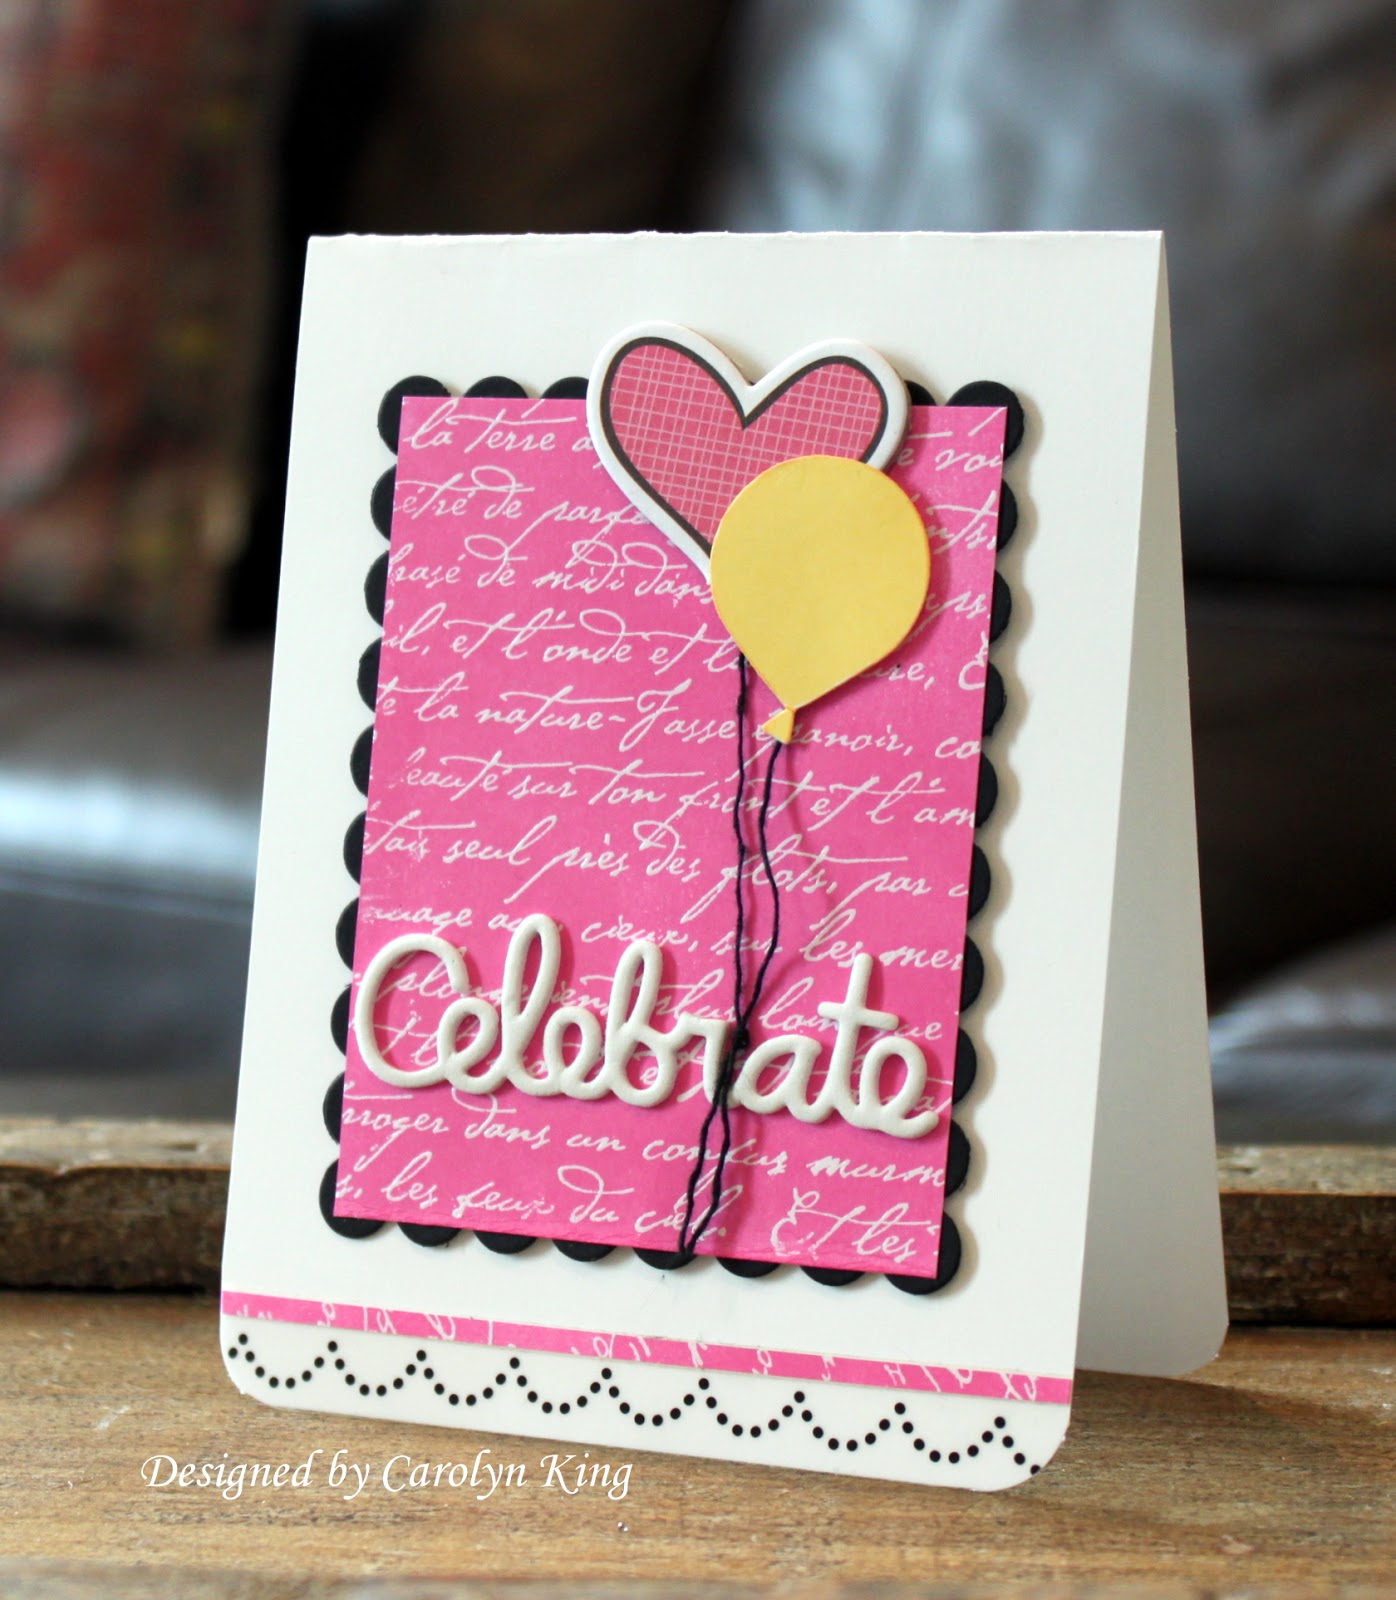
Popping in to share another fun birthday card (that could also be used as a Valentine card!).
For this card, I die cut the Celebrate Word using adhesive foam for the sentiment and just popped it over the background that I created by clear embossing the script (Stampin' Up! from 10 million years ago) and then sponging Picked Raspberry distress ink over it.
One balloon was a chipboard sticker that I had sitting on my desk and I paired it with a balloon I stamped with Let's Celebrate stamp set in Memento Dandelion ink. I die cut it it using the Celebrate Balloons die.
I trimmed a strip of the panel and added that along the bottom of the card just above the Sticker Stitches from S.R.M.
Off to get the day started....
Enjoy your day! Thanks for stopping by!
Cammie
Wednesday, June 13, 2012
He's All That - Cardmaker Blog Hop
We all know what a challenge it can be to create a striking masculine design so I am especially excited to see what my awesome teammates came up with today.
Here is my father's day card:
I used some of my favorite supplies for this card and really like how they all complimented each other. I used the Silhouette file Father and Son (Snapdragon Snippets LLC ) for the main image. (Love it!) The paper/sticker is by Echo Park: This & That: Charming collection. I used a SRM sticker from Express Yourself-Father's Day along the bottom of the card. The fun background paper was highlighed with some SU! Magic Mesh (remember that stuff? I still have some!) Finally, I added some Cappuccino baker's twine (The Twinery) that I wrapped around the card and then used my Tiny Attacher (Tim Holtz) stapler to secure in place. All of the elements were sponged with some Tea Dye Distress ink (Ranger.)
Hope you like it!
If you want to see some really inspiring ideas---head on over to these blogs:
Cardmaker Blog
Kimberly Crawford
Carolyn King--- you are here!
Colleen Schaan
Anya Schrier
Trudy Sjolander
Michelle Woerner
Thanks for stopping by today!
Saturday, December 17, 2011
Ballerina Tag
You can find all the details on this design on the Helmar blog!Thanks for stopping by!

Wednesday, January 12, 2011
You make my heart bloom
So..... I have a card to share using the newest Stamp TV kit from Gina K Designs called Sent with Love. I created this for the release party last week but haven't had the chance to post it until today.
This kit has so many fabulous stamps. I mixed and matched a few to create this one. I stamped the tree and then stamped it again (so I could use a few heart clusters to put on the ground). I used the bird from the mailbox stamp (just stamped the whole image and then cut out the bird so I could put him in the tree).
I colored all the images with Copic markers. I added another one of the tree hearts to the sentiment to make it all matchy matchy!
Designer paper is by Jillibean Soup.Materials used: Stamps- Sent with Love (Gina K Designs); Memento tuxedo black ink; white cardstock (Gina K Designs); Copic markers; Dienamics Sunshine die (My Favorite Things); Designer paper- Soup Staples: Green Sugar, Atomic Soup: Minced Molecules (Jillibean Soup); Twine (Jillibean Soup); ribbon- mustard (Stampin' Up!) label punch (Stampin' Up!); Sewing machine; corner rounder punch (Creative Memories).
Thanks for stopping by!!

Saturday, October 16, 2010
Simply Fabulous
Here is a card featuring lots of COLORS (including my favorite--GREEN!) I used black to accent the main panel and help all those colors pop!
I used Grand Damask and Fanciful Tags (sentiment) for this card. I love the beautiful script of the sentiment. It looks good with anything!I stamped the damask stamp with a Spectrum Pad and I loved the different look it gave this formal design. A simple ribbon and some rhinestones complete the design.
Materials used: Cardstock-white, onyx (Gina K Designs); Designer paper- Twitterpated: Cute (Pebbles); Stamps- Grand Damask, Fanciful Labels (Gina K Designs); Ink-Memento Tuxedo black, Spectrum Stamp pad- Celebration (SU!); ribbon-Leafy (Dear Lizzy & AC); adhesive rhinestones (Recollections, Michael's)
Have a great day! Thanks for stopping by!

Friday, April 2, 2010
Quick Card Friday
Sorry for the erratic postings.....I have been so busy with baseball games, a sick child (ear infection), Easter preparations....etc. that I haven't had too much time to get crafty.
I wanted to share this quick creation with you today:
It is very simple. My favorite part is the little circles I punched and placed over the background flowers to add a bit of color! Black brads in the center of the circles tie into the flowers and sentiment color.Materials used: Stamp-Stampabilities; Memento tuxedo black ink; white cardstock (Gina K Designs); designer paper-black orchid 8 by 8 pad (SEI); black brads (Paper Studio); yellow ribbon (Stampin' Up!); small circle punch (SU!); slit punch (SU!).
I will not be posting over the weekend so have a wonderful Easter! See you next week!
Thanks for stopping by!

Tuesday, March 16, 2010
Tuesday Trigger!!!
Here is my card:

Which was inspired by this pillow from Pier 1:

Hope you will head on over to Moxie Fab World and play along!! I cannot wait to see what you create!

Wednesday, January 20, 2010
A Purrr-fectly Delightful Hop and Butterfly Tutorial
Tonight the amazing Theresa is hosting a blog hop with her newest release from Gina K Designs called Purrr-fectly Delightful. Here is the birthday card I created with the set:
I stamped the kitten on white pure luxury cardstock and colored her with Copic markers. I cut her out and popped her on top of the stamped kitten on the card base for some dimension. I used some October Afternoon-Farm Fresh designer paper throughout the card and created some little butterflies out of ocean mist cardstock (see below) and a flower punch.The happy birthday greeting is from Eclectic Summer Sayings set. I used a few Prima pearl swirls to create the butterfly paths. Hope you like it!
<---Punch flower shape from cardstock. I used the Five petal flower punch from Stampin' Up! (For the smaller butterfly, I used the three flower punch from Stampin' Up!)

<---Fold flower in half. (You may get a little wrinkling in the cardstock...that is ok.)
<---Using craft scissors, cut off the top of the flower (this is the petal that is folded in half) at a slant. 
<---Open up flower....it is now a butterfly shape! TIP: To add some dimension to the butterfly, use a sponge to ink along the edges.
Materials used: Stamps-Purrr-fectly Delightful, Eclectic Summer Sayings (Gina K Designs); Memento tuxedo black ink, bashful blue ink (Stampin' Up!), SU! markers-black, red; Copic Markers; Designer paper-Farm Fresh (October Afternoon); cardstock-pure luxury white, ivory, ocean mist (Gina K Designs); ribbon (SU!); Say It In Crystals Pearls White (Prima); Flower punches (Stampin' Up!); tag punches (Stampin' Up!); corner rounder punch (Creative Memories).
Jessica Fick
Melanie Muenchinger
Nina Brackett
Carolyn King
Lee Murphy
Erika Martin
Joan Ervin
Jen Charboneau
Tina Gilliland
Thanks for stopping by!

Wednesday, October 28, 2009
Gina K Preview Day 3
Here is a slider card I created with Winter Friends:
The minute I saw this gliding penguin, I wanted to make a slider card with him. The little houses/scenery in the set make the perfect backdrop for this cutie.
Here is a another view---just to show you he made it to the other side ok! A slider card is perfect for this stamp because he can wobble and tilt all the way across your card (just like most of us ice skate!)
I colored all the images with Copic markers and added some frosted lace stickles on the rooftops, trees and hills.
The sliding mechanism was created using a Word Window punch (SU!) to create the path. I used some dimensionals (SU!) to create the sliding penguin. (I used one on the penguin's back and then one on the other side of the punched strip and then added a punched circle so that the tab wouldn't stick to the inside. Note: I never use a penny on my sliders because I don't like the added weight and find that this way works just fine!) The penguin slides and turns easily!
Materials used: Stamps-Winter Friends (Gina K Designs), snowflakes from Holiday Cheer Stamp TV kit (Gina K Designs); ink-Memento black, bordering blue (SU!); cardstock-white, rocket red, tan leather (all Gina K Designs); designer paper-Jolly by Golly (Cosmo Cricket); ribbon (Gina K Designs); corner rounder punch (Creative Memories); Copic markers; stickles-frosted lace (Ranger); red adhesive dots; word window punch (SU!); dimensionals (SU!); sewing machine.
We have a couple of our Center Stage Spotlight Designers joining in the previews tonight. Here are their blog links:
Then, stop by these Gina K Designers' blogs for even more projects with tonight's stamp sets:
Carolyn King --> You are here!
Cathy Tidwell
Cindy Lawrence
Donna Baker
Erika Martin
Emily Giovanni
Jessica Fick
Kurtis Amundson
Lee Murphy
Lynn Mercurio
Nina Brackett
Melanie Muenchinger
Theresa Momber
Thanks for stopping by!

Friday, October 16, 2009
Lord of the Season Blog Hop
Tonight, the Gina K Design team is hosting a blog hop featuring the gorgeous new set by Nina called Lord of the Season. I chose to use more funky colors for this card--to illustrate that the images do not have to be used for formal cards only!
I used some of my favorite designer paper from the White Out collection (We R Memory Keepers) to paper piece the tree. I added some fun red dots for ornaments. I inked the edges of the sentiment piece to go with the pop of blue throughout the card.Materials used: Stamps-Lord of the Season (Gina K Designs); Memento tuxedo black ink, turquoise ink (SU!); sponge; cardstock-pure luxury white (Gina K Designs); Designer paper-White Out Collection (We R Memory Keepers); lattice border punch (Martha Stewart); Corner rounder punch (Creative Memories); Spellbinders scalloped rectangle die; Cuttlebug (Provocraft); ribbon (May Arts); star punch (SU!); red adhesive dots.
GinaK Designer's joining in on the hop tonight:
September's Center Stage Spotlight Team:
Thanks for stopping by! Have a GREAT weekend!

Tuesday, October 13, 2009
JustRite Christmas Treasures
It is, however, a great day to create...
Here is a card I made with the beautiful JustRite Christmas Treasures set:
Here is a view from the side so you can see that the front panel is cut to frame the sentiment:
I colored the image with Copic markers and sponged some bashful blue ink around the perimeter of the circle. (Still haven't bought an airbrush system because I am not convinced that I need one!)
Friday, September 18, 2009
Fruitful Harvest Blog Hop
Although I don't make a lot of elegant, lacy, distres-y, vintage-y type cards...sometimes I just feel the need to try. I love the beautiful grapes in this set and wanted to give my card the same feeling I felt when I first saw them:
I added some lace along the side and some rhinestones under the "friend" part of the sentiment. The background is stamped with French Script backgrounder (SU!) and I used tea dye distress ink all along the edges (with a sponge).The grapes are stamped twice....once on the background paper and once on white pure luxury cardstock. I colored them both in with Copics and the cut out the grapes on the white cardstock, adhering the section on the left right on top of the stamped one and adding some dimension to the rest of the bunch with some mounting tape.
Heeheee....the background purple paper is from a Halloween paper pack that was sitting on my desk!!!
Materials used: Stamps-Fruitful Harvest (Gina K Designs), French Script (SU!); Memento tuxedo black ink; Ranger tea dye and vintage photo distress ink; sponge; Copic markers; designer paper- Halloween pack (Recollections); cardstock-white (Gina K Designs, pure luxury), cocoa (SU!); lace; ribbon (May Arts); adhesive rhinestones-Autumn (Recollections); Spellbinders tag ties; Cuttlebug (Provocraft); hemp (Hobby Lobby); paper piercing tool.
For even more inspiration with the Fruitful Harvest, head over to Asela Hopkin's blog, the illustrator of this beautiful stamp set. She has also asked her friend Deb Felts to share a card with us tonight too!
Then, take the time to check out all the other GinaK Design Team Member's sharing projects tonight on their blogs: Emily Giovanni , Erika Martin , Gina Krupksy , Jessica Fick , Kurtis Amundson , Lee Murphy , Lynn Mercurio , Melanie Muenchinger , Theresa Momber
and our CenterStage spotlight designers: Geri Utterback and Shelly Wilson
Have a great weekend. Thanks for stopping by!

Tuesday, September 8, 2009
Do You Believe in Magic???
When I first saw these images I was immediately drawn to the adorable witch...she is so cute and I knew I wanted to make a little treat bag featuring her.
I cropped the original image of the witch (she is sitting on a mushroom in the actual stamp) and I had her sitting on a cauldron (that I just cut from designer paper) instead. Since I wanted to use these little eyeball chocolate crisp candies inside---I thought having her sit on a cauldron working up a spell would work well. (Who knows what she is planning on turning a bunch of eyeballs into anyway??!!) The set comes with a cute little star wand so I took that idea and just made it larger (so it wouldn't get lost in the busy design) and used a punched star covered in glitter for her wand.I used my treat tote tutorial to make this pouch. I just made this a bit wider to accommodate the large window. I put the eyeballs into a clear envelope before securing them inside and then I re-used the mesh bag the candies originally came into to add to the inside of the window. (I cut the mesh bag open and then adhered it to the backside of the front opening.)
Materials used: Stamps-Feel the Magic (Gina K Designs); cardstock-white Pure Luxury (Gina K Designs); Copic markers; stickles-purple and gold (Ranger); designer paper--Stampin' Up, Halloween paper pack (Recollections); circle punches (Stampin' UP); star punch (SU!); slit punch (SU!); scalloped circle punch (SU!); Spellbinders Nestabilities dies; crystal stickers (Mark Richards); hemp; orange ribbon (May Arts); (candy).
Boy, my kids are gonna be so happy to see this posted---- they have been patiently waiting to eat those eyeballs!!!
Wanna see some more MAGIC??? Joining us tonight with special projects made with Alicia K's Feel the Magic Stamp set are these amazing designers:
Gina, Asela, Donna, Emily, Jessica, Melanie, Theresa and Erika.
*******
NSR (Non stamping Related): My baby, Lauren, started preschool today. My other two kids started school already but she didn't start until today. She marched right out the door---totally happy....no worries at all! Gotta love THAT!

Hope your day is MAGICAL! Thanks for stopping by!

Saturday, July 18, 2009
A Tree-mendous Surprise
Materials used: Stamps-Whimsical Autumn, Eclectic Summer Sayings, So Grateful (Gina K Designs); Memento tuxedo black ink; designer paper-Frenzy Glee (We R Memory Keepers), Crunching leaves (October Afternoon); cardstock-green (SU!); white -Pure Luxury (Gina K Designs); Copic markers; hemp (SU!); metal rimmed tag (SU!); paper piercing tool; ribbon (Offray).Thanks for stopping by!

Friday, July 17, 2009
Mixing and Matching Stamps with JustRite and Blog Candy
Today I have a simple card using the JustRite Friendship Borders & Centers Round. (This set is currently sold out at Stamper's Dream but should be back in stock soon!)
I wanted to show you how you can combine portions of the stamps in any of these sets to create a whole new look (making them even more versatile!)
I stamped just the tree two times, inking up the tree with markers so I could leave out the sentiment next to it. Then, I cut out and popped up the top part of the tree over the first image (which was cut out using a circle Spellbinders die).
I used half of the sentiment ring from the set "It takes a long time to grow an old friend." I thought this went so well with the tree (cause you know they take a LONG time to grow too!) I added a tiny heart into the tree as a finishing touch.The "Friend" sentiment at the top is from a stamp in the set that has a pot and says "Friends"...I just inked up the part I wanted to use, stamped it and then punched it out.
I went with minimal for this design and chose to just add a few squares of designer paper by Kaiser Craft along the side.
Materials used: Stamps-Friendship Centers & Borders (JustRite); Olive, chocolate chip markers (SU!); cardstock-olive, vanilla, red (SU!); ribbon (SU!); designer paper-Kaiser Craft; oval punch (SU!); Spellbinders circle and scalloped circle nestabilities; Wizard (Spellbinders); corner rounder punch (Creative Memories).
Hope you like it!
Blog Candy (is now closed!): It has been awhile since I gave away some blog candy. Want to win of my favorite JustRite sets---Girl Time Borders & Centers? *Click link to see set* Just leave a comment on this post and tell me what your favorite JustRite set is! (Subscribers can post twice!) Random.Cara will select a winner on Sunday night at 8 p.m. central time. I will post the winner Monday morning. The winner will have 3 days to email me to claim their prize before another entry is drawn. Special thanks to JustRite for this set donation.
Now head on over to these Dream Team-ers for some more JustRite inspiration: Kimberly, Charmaine and Michelle.
Thanks for stopping by!

Sunday, July 12, 2009
New Chick in the House
Since I didn't have any "baby" stamps from Stamper's Dream to use for this card---I chose instead to use this cute chick from the Pink Paislee set Spring Fling. The images in this set are fun and trendy....they work well for any occasion. This card totally reminds me of Charmaine!!
Here is the card I am sending to Charmaine to help welcome the New Chick in the House:
To help show the versatility of these images/set---here is the same card with a few alterations--as a Thank You:
Materials used: Stamps-Spring Fling (Pink Paislee); Memento tuxedo black ink; Heart punch-Marvy Uchida; Designer paper-Morning Glory-Ally's Wonderland (SEI), How's It Going-Everyday (American Crafts), Frenzy Glee-White Out (We R Memory Keepers); paper piercing tool; rhinestones (Brenda Walton-K& Company); ribbon (SU!); Card Sayings rub ons (Making Memories).

Tuesday, July 7, 2009
Forever Friends...
For this card I combined the children The Journey with the background from Happy Camper ,both from Gina K Designs. This card reminds me of the trip we took with our kids to the Grand Canyon and Utah this past spring break.

I stamped the background and colored the mountains and trees with Copics on Pure Luxury white cardstock and sponged the sky. I used the sentiment from The Journey. I stamped the children and colored them with Copics and then raised them a bit over the scene to help create some dimension. The card is created on rocket red cardstock and I added some chocolate kiss to offset the image on one side.
The ribbon is from Gina K Pure Luxury holiday collection. I added some new self-adhesive nail heads on the sides of the sentiment.
These sets really work well with each other.
Materials used: Stamps-The Journey, Happy Camper (Gina K Designs); Memento tuxedo black ink; Copic markers; sponge; mustard, bashful blue stamp pads (SU!); Cardstock-rocket red, white, chocolate kiss Pure Luxury (Gina K Designs); ribbon - Gina K designs; Spellbinders circle/scalloped circle dies; metal nail heads (Gina K Designs; oval punch (Stampin' Up!); dimensionals.
Stay tuned: Something FUN is coming to Gina K Designs on FRIDAY!
Thanks for stopping by!

Wednesday, June 24, 2009
Gina K Preview Day 2
Here is a little journal I created with Arranged with Love. This set comes with a gorgeous HUGE background stamp that has a little journal box built in. There are many scripted sentiments to add in-- so it is easier than ever to create simple but stunning creations. For this journal, I chose to layer the sentiment from Say it with Flowers over the background. The background is also trimmed a bit on top and bottom to fit the journal front.

All of the ribbons used on this project are from Gina K Designs Stamp TV kits. As a final touch, I stamped the background in red ink on white cardstock and rolled it up to fit inside a R.S.V.P. pen.
Materials used: Stamps-Arranged with Love, Say it with Flowers (Gina K Designs); Memento black ink; copic markers; cardstock-white, black onyx (Gina K Designs); Pink (Prism); ribbons (Gina K Designs, from Stamp TV kits); journal (Michael's $1 spot); red ink (SU!); R.S.V.P. pen (Pentel); brads (Gina K Designs); Spellbinders Labels 4 and Long scalloped rectangles; Cuttlebug (Provocraft).
Next, Nina is back with a simply adorable set called Bug Me Anytime. She also has some coordinating digital paper that will be released too. I LOVE it. I used a piece on this card along with the flower image and sentiment:
Aren't the colors fun? I went with the colors in the digital paper for the design of the card. I printed it on Pure Luxury white cardstock and it looks beautiful. I also used some of the new Pure Luxury Soft Sand cardstock to mat the main image and some white Pure Luxury behind it.I layered the flower and added the little leaf sentiment.
Materials used: Stamps-Bug Me Anytime (Gina K Designs); cardstock-white, soft sand (Gina K Designs); digital paper-Bug Me Anytime (Gina K Designs); polka dotted dp (SEI); paper piercing tool; Spellbinders blossom die cut; Cuttlebug (Provocraft); chocolate marker (SU!); flower punch (SU!); felt flower (SU!); brad; corner rounder punch (CM).
You can see more creations with these two sets on the design team blogs:
Gina, Cathy, Cindy, Donna, Emily, Jessica, Kurtis, Lee, Lynn, Melanie, and Theresa
and, be sure to check out our CenterStage Spotlight girls joining us in Previews today: Carla Suto and Melisa Waldorf .
Melanie also has some guest designers working with her set today: Selma, Denise and Dawn.
Release Party Details: Join us here in our forum on this thread-Thursday, June 25th from 7-10 PM Central Time for all the fun! Then at 10 PM central time, we will release 6 new stamp sets, new Pure Luxury card stock and some great new accessories! Gina will be giving away lots of freebies too, including templates and digital paper! We hope you'll come and party with us!
Thanks for stopping by! Another preview coming tomorrow!

Tuesday, June 16, 2009
Baby on Board
I combined the ambulance from Nurse Feelgood with the bear from Wee Tees and the sentiment from Little Tees (all from Gina K Designs) to create this new baby card!
Kind of a funny combination of elements but I like it!
The white and rocket red cardstock is from Gina K Designs and the ribbon is from her Eclectic Summer kit.
And just in case you were wondering----Nope--I still cannot sew. The sewing around the white mat is fake! Maybe....someday!!
Materials used: Stamps-Nurse Feelgood, Wee Tees, Little Tees (Gina K Designs); Memento black ink; Copic markers; cardstock-white, red (Gina K Designs), blue (Prism); ribbon (Gina K-Eclectic Summer Kit); designer paper-Bridgeport (SEI); digital paper-Gina K Designs; SU circle/scalloped circle punches; paper piercing tool; clip; Mark Richards metals stickers; slit punch (SU!); dimensional foam tape.
Heading to Sea World tomorrow with my kids and my sister and nephews who are here visiting!!! Woohoo!!!
Thanks for stopping by!

Saturday, June 13, 2009
Recycled Love
I am working on my final projects for my final Dirty Dozen gallery and took a break to play with this this new set from Unity called Love Grows.
I adore this heart-y tree---So much fun to play with! The sentiment is also part of this set and there are more really cool images!!! I know I will using this a lot!

And do you see that big ole ribbon??? That was recycled from a new teen store I went to with my daughter. When you check-out, they put your items in a fun bag and tie a ribbon around it. The cute part is that they let you select the ribbon and when my daughter found that out, she said "Go ahead, Mom! Pick what YOU want!" Ahh...she knows me too well!!! I finally found the perfect home for it right on this card!
Materials used: Stamps- Love Grows (Unity Stamp Co.); Memento tuxedo black ink; white/black cardstock (Gina K Pure Luxury); Kraft Cardstock (SU!); designer paper- trad. tiny words (KI Memories), Green-Canopy: Brunch Collection (Crate); ribbon -recycled from store, gingham-Offray; key tag punch (SU!); clip (SU!); Copic red marker; black, red Stampin Up! Markers; Brenda Walton adhesive rhinestones (K & company); Raindot hearts (Gina K Designs); Cutting system (Creative Memories); paper piercing tool.
Thanks for stopping by!