Showing posts with label Valentine's Day. Show all posts

Monday, February 13, 2017

Sending Love Your Way

Happy (almost) Valentine's Day!  It's a great time of year to use this set called Heart Bouquet from My Favorite Things:

I stamped her in some light ink and colored her with Copic markers and Prismacolor Pencils.  Such a sweet stamp!


Hope you have a wonderful Valentine's Day!  ðŸ˜˜

Thanks so much for taking time to stop by today!
Cammie

Tuesday, February 7, 2017

Pink Love

Hello!

Just popping in with a Valentine---I die cut the Love word die from Paper Smooches from some adhesive foam and then sponged it with Picked Raspberry distress ink.  I also clear embossed a heart image along the bottom that I found in my stamps but have no idea where it came from. I am assuming it is pretty old?!

Added some Heidi Swapp glitter hearts, SRM sticker stitches and some black twine (The Twinery) to finish it up:
Thanks for stopping by!

Cammie

Saturday, February 4, 2017

Pretty in Pink

Hi there!  Hope you are enjoying your weekend:)

Popping in to share another fun birthday card (that could also be used as a Valentine card!).

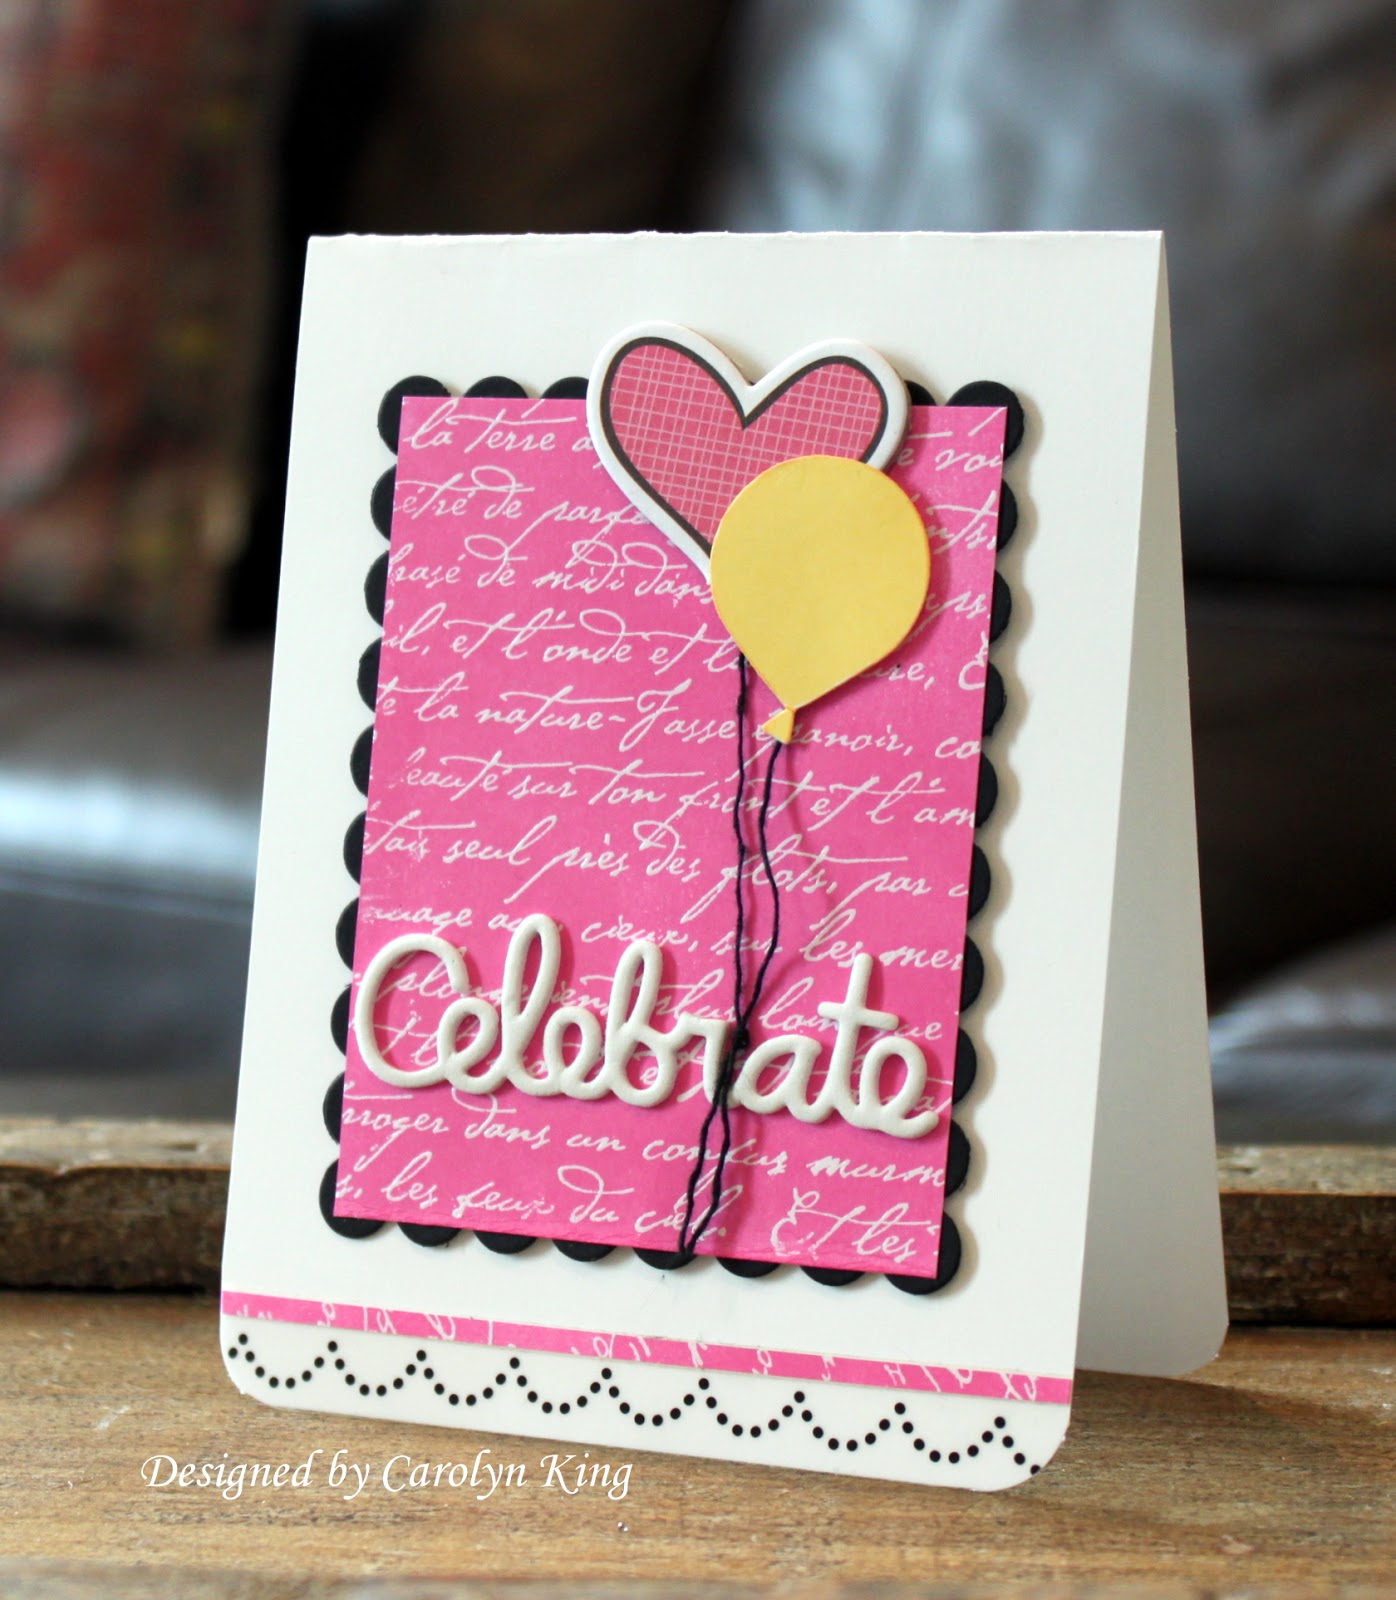
For this card, I die cut the Celebrate Word using adhesive foam for the sentiment and just popped it over the background that I created by clear embossing the script (Stampin' Up! from 10 million years ago) and then sponging Picked Raspberry distress ink over it.

One balloon was a chipboard sticker that I had sitting on my desk and I paired it with a balloon I stamped with Let's Celebrate stamp set in Memento Dandelion ink.  I die cut it it using the Celebrate Balloons die.

I trimmed a strip of the panel and added that along the bottom of the card just above the Sticker Stitches from S.R.M.

Off to get the day started....

Enjoy your day! Thanks for stopping by!
Cammie

Tuesday, January 31, 2017

LOVE

Hello!  It's a busy week here and so I am just popping in my craft room when I get a few minutes each day.  This card is made up of a few things that were sitting on my desk:) and I put it together over the course of a few days...

The main focus of this card is the LOVE die cut from Paper Smooches:
 
I cut the letter O out and then layered the heart and embellishments over it.
A cute, easy Valentine and bonus points for using a bunch of scraps up:)

Thanks for stopping by!  I'll be back on Thursday to share my Paper Smooches cards for this week.

Cammie

Thursday, January 26, 2017

Scrappy Love

Hi!
Just popping in with a super quick card I made with some scraps I had in my overflowing scrap drawer.  I have had these Melissa Frances rub-on sentiments forever and I wanted to see if they would still work....they did!

That is it! Hard at work on my samples for Paper Smooches that I will get to share soon....
Yay!

Cammie

Thursday, January 24, 2013

Gina K Mix and Match Hop

The Gina K Designs illustrators are hopping today to share some fun ways to combine the new release stamp sets. Hope you will join us as we Mix and Match!
For my first project, I used Stamp It Big (for the lines across the front of the top of the camera, small blue flower), Spoon Me! (Sentiment and small Polaroids, hearts); and Simple Hearts (messages on Polaroids and ring on the camera lens) to create this little camera treat holder:
I used the clear pillow box (SRM Stickers) to make the camera part.  I filled the camera with Hershey's kisses and the little stamped Polaroids to add some fun notes inside.

Next, I have a card that pairs Stamp it Big (large sentiment, small hearts), and Stately Flowers 6 (Valentine sentiment) and Skater Diva:

I wanted to show the Skater Diva in a different way so I stamped her behind the punched heart and it looks like she is just ready to give a hug to her friend!  The Red Hot Gingham ribbon is from the Gina K Designs Color Companion Collection.

 Here is a simple greeting pairing Stamp it Big  and Stately Flowers 6:
I stamped the group of flowers from Stately Flowers 6 and cut out the one flower on the edge.  I did this again and cut out the flower and two of the leaves so I could stack them up and add some dimension.  I embossed the large "Thanks" sentiment from Stamp it Big to finish off the simple design.

And....this one pairs Stamp it Big with Birds and Blossoms:

Just a fun, bold birthday greeting.  I cut out the bird using the cut file and then stamped the bird in black to have a bold image to break up all the color.  I used Ocean Mist Gina K Ink to stamp the sentiment (love this color!) and tied a little bow using the Ocean Mist Organza from the new color companions collection.
Finally, I have a card that pairs up Lovely Ladybug with Lots of Letters!  (ok...so Lots of Letters was from a prior release but I thought of this card idea and HAD to do it!):
Get it?  I was such a PAC-MAN nut when I was young. When I saw this particular ladybug design, I immediately thought of it and had to make this:

 I used Lots of Letters to spell out the sentiment.

 Well, that's it for me.  Now head on over to the rest of the illustrator team to see what they chose to MIX and MATCH:
Carolyn

Thanks for stopping by!

Wednesday, January 9, 2013

Samantha Walker Creative Crafters Team Blog Hop

Welcome to the Samantha Walker Creative Crafters Team Blog Hop! (My first one with this wonderful team!)
You should have arrived here from Maya Oren-Dahan's blog!

If this is your first stop, be sure to head over to Samantha Walker's blog to start at the beginning!

!

This month one lucky winner will receive the fabulous


AND be sure to look extra closely at Step #4 to learn how you can get this FREE SVG and Silhouette Studio file:

To enter, just leave a comment on Samantha's blog during January 9th through January 13th. The winner will be announced on Samantha's Facebook page on Monday, January 14th. 

For additional entries:
1. Receive an additional entry for commenting on each of the other blogs in the blog hop.

2. Go here and follow Samantha Walker's blog 

3. Follow her on Facebook

4. Sign up for an e-mail subscription to Samantha's blog and you will automatically receive a link to a free SVG cutting file that you can download and use on your personal electronic cutter. If you are already a subscriber, just enter in your information in the secure form on Samantha's blog!  The free files will be e-mailed early next week!

To receive the additional entries and get the free files, mention in your comment on Samantha's blog that you have done so! 

WOW, that is 17 chances to win!

Here is my project for the hop! Our theme was Winter--and since Valentine's Day falls in Wintertime--I took this opportunity to use some of Samantha's fabulous Silhouette files to create a Valentine mini album:


I used a piece of chipboard to create the front cover and then cut some pages from cardstock.  After decorating the cover, I punched a hole through the cover and pages and added a binder ring:

Here are the files I used:
'10 Things I Love About You' phrase
1 piece flourish bracket
Keys
Decorative tree (I used the bird from this file!)

The note pages are all read to fill!

Thanks so much for stopping by!  
Click below to head over to 
Samantha Walker Facebook Page!

Your next stop on the hop is Claudia Harvey!

Happy Hopping! Thanks for stopping by!

Sunday, January 6, 2013

GKD Sneak Peek - Stamp it Big

Hi there! I am super totally extremely excited today because Gina is sharing two more sneak peeks of the new January release stamp sets on HER BLOG.  Today's peeks are of my new set, Stamp It Big, and Melanie Muenchinger's new set, Stately Flowers 6 I love that I am peeking with my friend Melanie because she helped me so much with this set. It has been awhile since I released a set (before clear was available and before Gina has been cutting her own rubber).  Melanie held my hand while I was learning to navigate the software and offered tons of wonderful advice for the set.  Thanks sweet friend. xo

My card today features Stamp It Big.  To see a sample of Stately Flowers 6, check out Melanie's blog.  These sets also work very well together and I will be showing a sample of them together soon!

I am so excited to add this stamp set to my collection of Gina K stamps.  I have been wanting larger sentiments because I thought that was one thing that we don't have enough of... but I also wanted to create a stamp set that had MORE to offer.  Stamp It Big is a set that will work well with every other stamp set you own AND on it's own.  There are several large focal words and smaller accent words/phrases that combine to form tons of card sentiments. The patterns and icons make perfect backgrounds, focal images, and can be used to "Stamp Kiss" the larger words.  There is even a scalloped border stamp :)
And, there is a coordinating Silhouette file that will be available through Gina K Designs that contains outlines for the larger words and all of the smaller shapes as well as a large speech bubble and a thought bubble to add tons more options for using this set.  Don't have a Silhouette?  Not a problem--the set words well on its own and with punches you may already own.

For my peek--I used the set without using the Silhouette file:

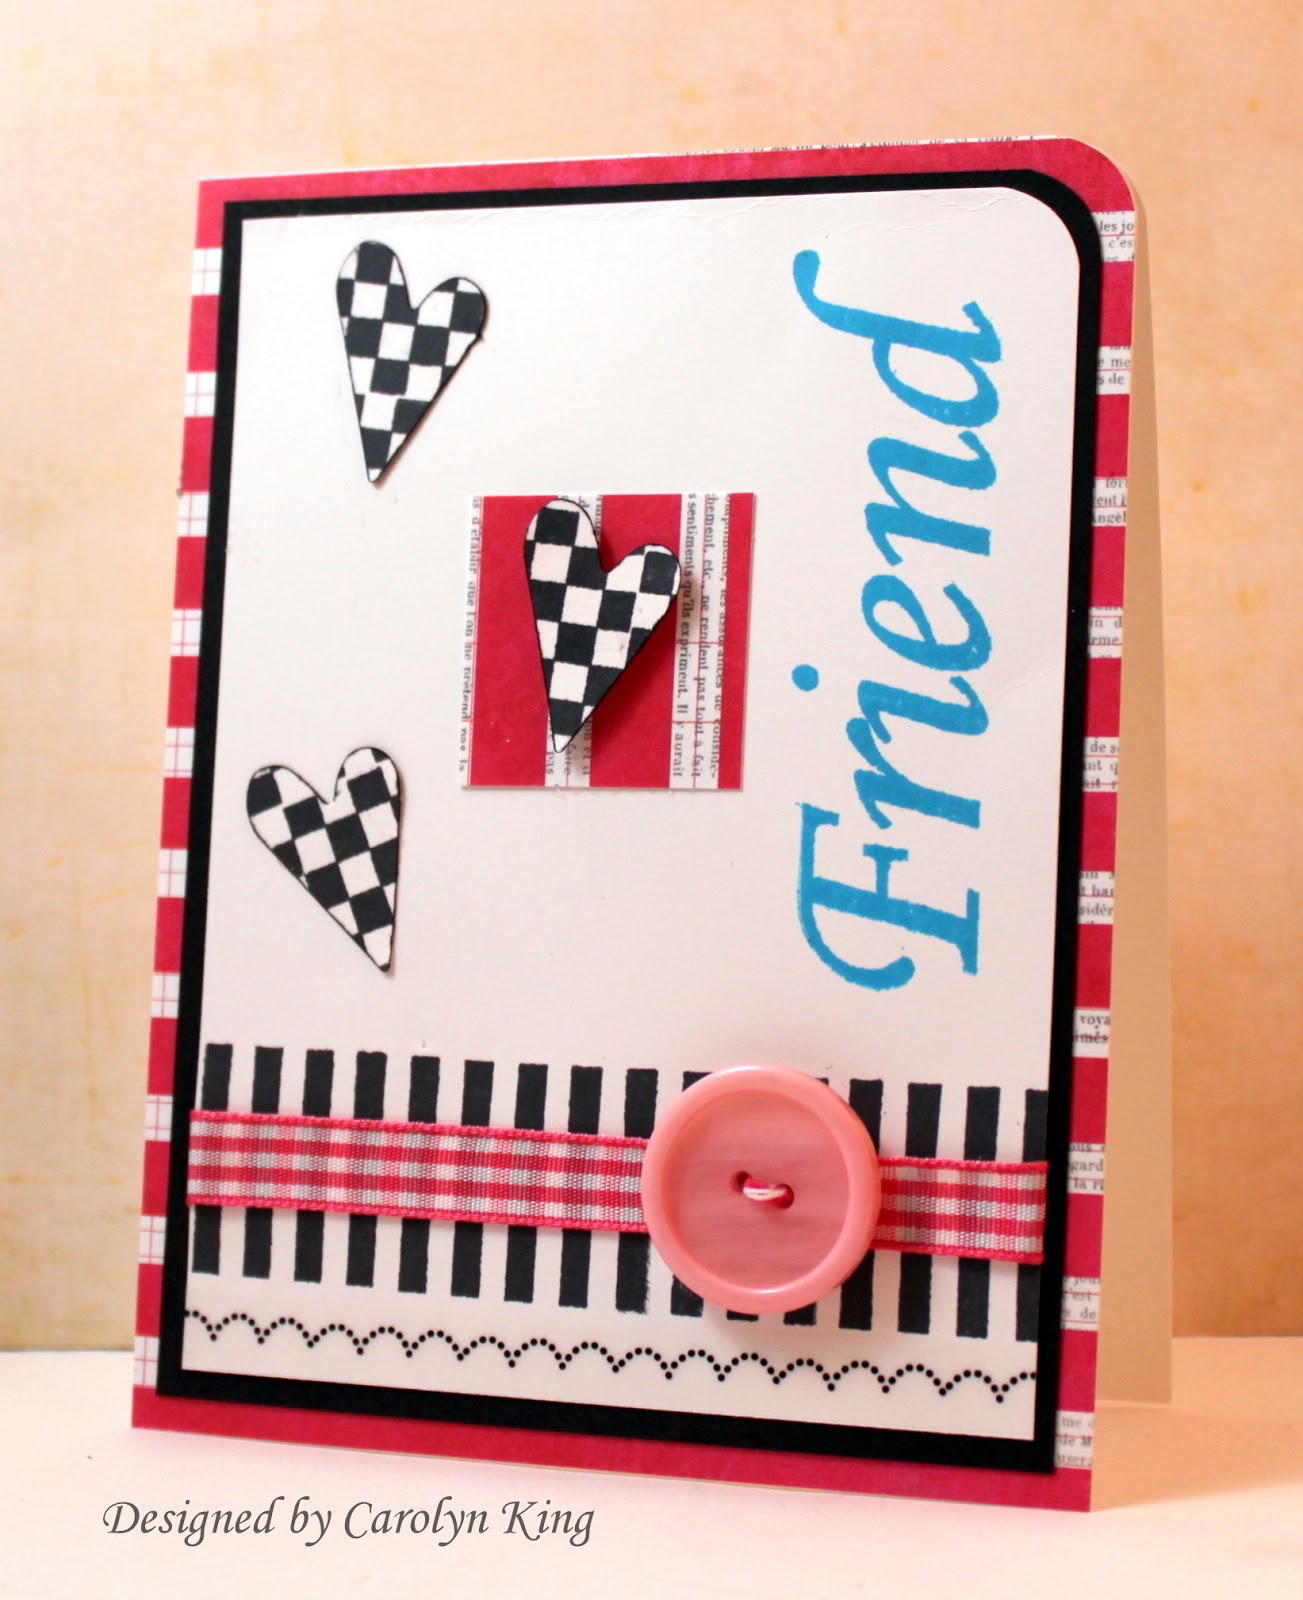
I stamped the large "Friend" on the Pure luxury white cardstock using Memento Bahama Blue ink.   (Note: The sentiment that comes in the set actually says "Friends"...and this is to make the set more versatile.  With one or two small cuts, the "s" is easily removed to stamp the word "Friend" and then replaced to make "Friends".  You can also simply not ink the "s" but I prefer the previous method to ensure that no residual ink remains on the stamp and could end up on the card.)  I punched some small hearts with an old SU! punch I had lying around and then stamped checkerboard pattern on them using Memento tuxedo black ink before adding them to the card.  I popped up one to give it some dimension.

I used the stripe pattern block and stamped it repeatedly (totally simple to line up with clear stamps!) along the bottom of the card to create that border and then added some of the new Cherry gingham ribbon (available at Gina K Designs on Thursday night!) and a button from Tickled Pink Assortment of Buttons (also part of the new release!)


This graphic card was simple to make and the possibilities are endless for the combinations of patterns and sentiments.  You will see lots more ideas in the coming weeks.  LOTS!

All of the new stamps being peeked this week will become available in the What's New section of Gina K Designs on Thursday evening and there will be more sets peeked tomorrow on Gina's blog.  Please join us for an illustrators hop on Thursday morning at 8 am CST (9 am EST) to see all the new sets in action and then for the Release Party on Stamp TV on Thursday night from 7-9 pm CST (8-10 pm EST).

Hope you like my new set!  Thanks for stopping by!

Friday, August 31, 2012

SRM Project Recap

Happy Friday! Hopefully you had a good week! Mine was wonderful because all three kids had a great first week at school! Whew!

I thought I would share some projects that are on the SRM Stickers blog this week!  
This Valentine treat holder/card was on the SRM blog on Wednesday.  You can check out the details HERE.

And, this festive Halloween frame is up on the SRM blog today.  You can check it out HERE.
Thanks so much for stopping by!  Have a wonderful (holiday) weekend!

Friday, January 27, 2012

Love you Beary Much

Hello!!!! I am super excited because I am getting ready to head to CHA tomorrow morning!  I am very excited to see my stampy friends and to see all the new things that will be introduced at the show:)

Before I go, I have a cute little card to share... love this little fella from The Cat's Pajamas:


Supplies:
Stamps:  Honey Bear (The Cat's Pajamas)
Sentiment sticker- Fancy Sticker Sentiment- Love (SRM Stickers)
Ink: Memento tuxedo black
Patterned paper- Times & Seasons (Echo Park); Authentique
Copic Markers
Mini clothespin
Fibers- Baker's twine- Cappuccino (The Twinery)
Corner rounder punch (Making Memories)

Have a great week! Meet you back here for some fun-tabulous blog candy next week!

Wednesday, January 4, 2012

{Be Mine} Birdhouse

Hello! Happy Wednesday! I am officially freezing now. The temperatures here have suddenly taken a turn towards deep winter and I cannot seem to keep my hands warm! (But the kids are loving it!)

I was at home the other day and decided to play around with Echo Park's Valentine release called "Yours Truly." I truly love this collection. Since I was kind of looking to alter something---I want looking in my stash and found a wooden birdhouse I picked up a few years ago.

I took the little dowel out of it and decided to make it a cute Valentine decoration--to bring me out of the winter doldrums :)

Here is what I ended up with:


I painted the birdhouse with white acrylic paint and then after that dried, I covered the sides of the house and the roof with Helmar Premium Craft Glue and added the patterned paper. (I sponged the edges of all the patterned paper with Ranger Antique linen distress ink before gluing!)

I wanted to suspend the little clear heart from the top shingle over the love birds so I used my paper piercing tool (yep, I got a new one as my other one broke when i jammed into a locked bathroom door :) to make a hole up under the shingle. Then, I inserted a finding into it and the heart charm hooked onto the end.

I used some Maya Road felt birds to add the the Echo Park Yours Truly heart sticker. I also added some tiny rhinestones all along the outside part of the heart to dress it up a bit.
The bottom of the house is lined with some Twinery baker's twine. I used some Helmar 450 Quick Dry glue to adhere the buttons along the front of the house and to attach the lace to the roof. After adding the lace, I put a small row of pearls on the top edge of the lace.
The final touch was the little {Be Mine} tag courtesy of a SRM sticker.
Feminine and simple. Definitely helped to lift my mood a bit.

Supply list:
Wooden house (Hobby Lobby or craft store)
White Acrylic paint
Helmar Acid Free Glue, Helmar 450 Quick Dry
sponge
Ink-Antique linen distress (Ranger)
Baker's twine- (The Twinery)
Patterned paper and stickers- Yours Truly collection (Echo Park Paper)
Sticker- {Be Mine} (SRM stickers)
MicroFelt birds - (Maya Road)
Rhinestones/pearls - Recollections, Michael's
Buttons- (Papertrey Ink)
Heart jewel
Paper piercing tool
Pink glitter- Doodlebug
Lace ribbon - Michael's

Thanks for stopping by!

Thursday, December 15, 2011

OCL Valentine Sneak Peek Blog Hop

Hello! Today the Our Craft Lounge design team is posting some extra special sneak peeks of the new Valentine's Day sets.

I used the fun set- Love is in the Air- to create this card:
I love this sentiment---can think of so many people I could send this to right now! I paired up the little hot air balloon stamp with some of the Echo Park Yours Truly patterned paper. Love the combo.

Blog Candy and Drawing:
Be sure to leave comments on all the blogs in the hop today AND tomorrow and on the OCL facebook page for a chance to win one of 4 prize bundles (one full set and one single). Winners will be chosen from the comments.
You have until Friday, December 15 at midnight Pacific time/ 3 a.m. Eastern to get your comments posted. The winners will be announced on the OCL blog on Monday.

Here is a full list of blogs:
OCL Blog
Kendra Wietstock
Lori Tecler
Tammie Edgerton
Broni Holcombe
Debbie Fisher
Carolyn King
Lori Barnett
Debbie Corbari
Lisa Eisner
Stephanie Serrano
Amber Hillman
Meredith Winston
Joy Stagg
Michelle Pearson
Dawn Barrett
Melissa Cash
Latrice Murphy
Deb Felts

Thanks for stopping by!! See you tomorrow for another sneak peek!

Wednesday, February 2, 2011

Beary Cute Treat Container Tutorial

Hello! It is getting closer to Valentine's Day so I thought I would share a tutorial on creating a sweet treat container. This project is easy to make and can hold treats, pencils, small toys, gift cards or whatever you want to put in it. Here is the finished project:
What you will need:
soup can (you can also use a crystal light container, empty paint can, or anything that has straight sides)
Clear stamp set- Honey Bear (The Cat's Pajamas)
Memento tuxedo black ink
Copic markers (or whatever you wish to color the images with)
Stampin' UP! Marker- real red
Cardstock- white (Gina K. Designs)
Designer paper- Atomic Soup: Pinch of Electrons (Jillibean Soup)
Craft wire (The Beadery)
Pencil
Mini clothespin (Hero Arts)
Glue Dots and adhesive (Glue Glider Pro- Glue Arts)
Scissors
Optional- glitter (Doodle Bug) and Quickie Glue pen


Directions:
Step one: Empty and clean out your soup can. Remove label.


Step two: Measure height of can and cut a strip of patterned paper to wrap around can.


Step three: Adhere paper around can. (Notice that I left the top and bottom edge showing. The paper fits nicely between the rims if you measure it just a bit smaller than the can.)

Step four: Stamp images on white cardstock. (I used Gina K. Design's pure luxury white cardstock. I like how it holds the ink and it is very smooth.)


Step five: Color the bear, bees and honey pot. I used Copic markers to color my images.


Step six: Cut out images. *I cut along the edges of all the images and cut the sentiment out in a square shape (see step seven below)


Step seven: Run a red marker along the edge of the sentiment. (It is important to use a water based marker, like Stampin' Up, on this step so the color stays on the edge of the paper.)


Step eight: Cut a section of the patterned paper to use under the sentiment. I cut along the pattern so that I kept the honeycomb shape.

Step nine: Wrap a piece of beading wire around a pencil and slide off. (I used beading wire because it is very easy to manipulate and you can cut it with regular scissors.)


Step ten: Adhere a bee to the end of the wire with a glue dot and manipulate the wire until you get the desired flight path for the bee. Adhere under sentiment panel with a glue dot.


Step eleven: I filled the container with a bag of candy hearts and tied it with a bow. Clip the sentiment onto the bow using a mini clothespin.


Step twelve: Repeat steps nine and ten to add a flying bee to the bear image as shown below. Attach bear image to can.


Step thirteen: (Optional) Add some glitter to the little hearts on the bee and to the honey on the honey pot.


Finished! Now you have an adorable Valentine treat container to surprise someone you love with on Valentine's Day!

Have a Beary nice day!
Thanks for stopping by!